White Velvet Cake: 5 Secrets to Bakery-Style Results
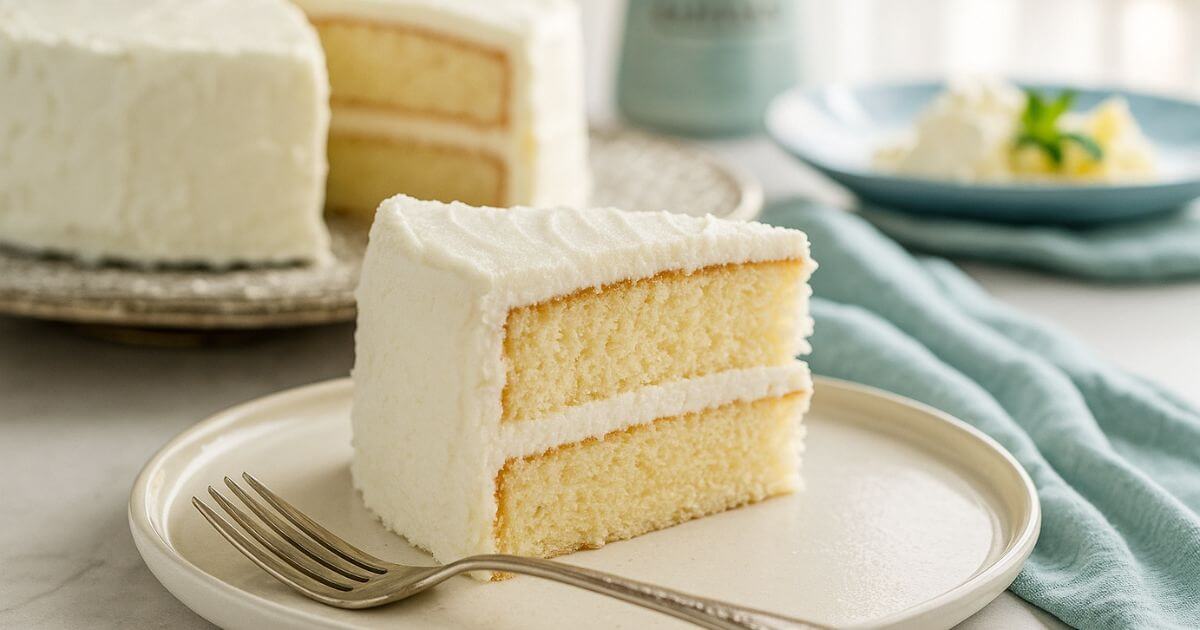
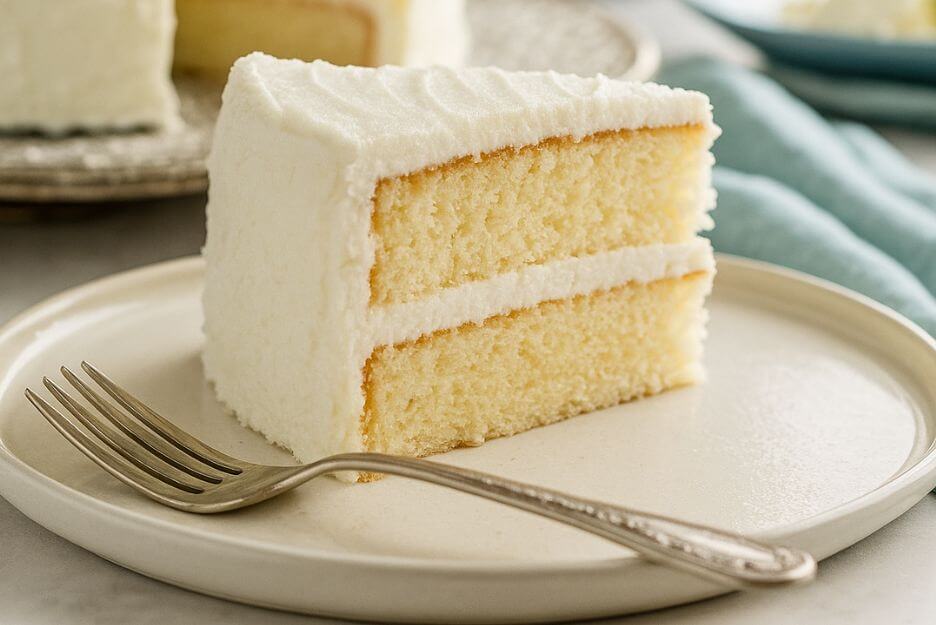
Have you ever dreamed of slicing into a cake so soft it feels like biting into a cloud? That’s the magic of White Velvet Cake, a dessert that’s as tender and moist as its name suggests. This cousin of Red Velvet Cake skips the red food coloring and cocoa, letting the pure flavors of vanilla and buttermilk shine. Whether you’re baking for a birthday, wedding, or just because, this White Velvet Cake recipe will impress everyone at the table. Let’s dive into the secrets that make this cake a showstopper and guide you through creating your own bakery-worthy masterpiece.
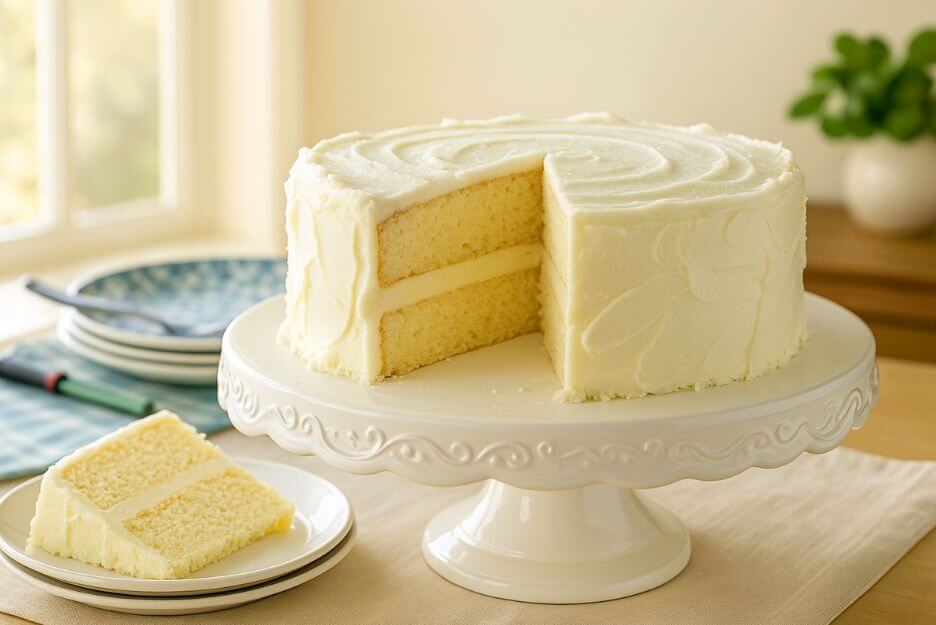
Table of Contents
The History and Appeal of White Velvet Cake
White Velvet Cake is a modern twist on the classic Red Velvet, which has been a beloved dessert for decades. While Red Velvet gained fame for its striking color and subtle cocoa notes, White Velvet Cake emerged as a versatile alternative, perfect for those who prefer a pure, creamy white cake with a velvety texture. Its light, fluffy crumb and nostalgic bakery flavor make it a favorite for celebrations. Plus, it’s budget-friendly and adaptable, making it one of the best white velvet cake recipes for home bakers.
5 Secrets to Bakery-Style White Velvet Cake
Want that bakery-style texture and flavor? These five simple secrets will take your White Velvet Cake to the next level:
- Reverse Creaming Method: Mixing butter into dry ingredients first creates a fine, tender crumb.
- Cake Flour: Its low protein content ensures a light, fluffy texture.
- Buttermilk: Adds tanginess and tenderizes gluten for a soft cake.
- Egg Whites Only: Keeps the cake bright white and enhances its lightness.
- Butter and Oil Combo: Butter brings rich flavor, while oil ensures moisture.
Ready to bake? Let’s get started with this comprehensive White Velvet Cake recipe.
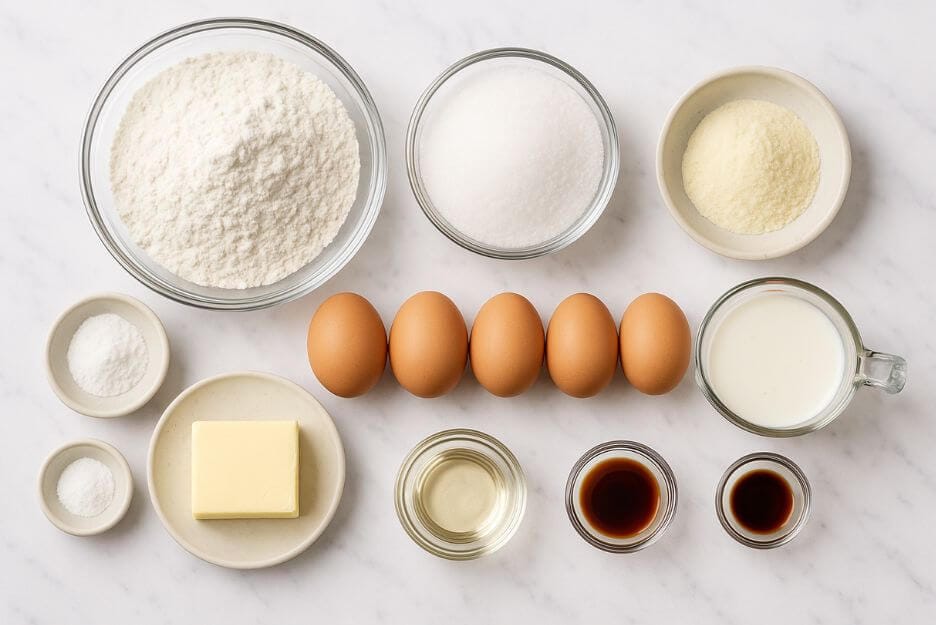
Ingredients
To make the best White Velvet Cake, start by gathering these ingredients with exact measurements. Using fresh, high-quality ingredients makes all the difference.
Cake Batter
- 2 3/4 cups (330g) Unbleached Cake Flour
- 1/4 cup (30g) cornstarch
- 2 cups (397g) granulated sugar
- 1 teaspoon salt
- 1 tablespoon baking powder
- 1/2 teaspoon baking soda
- 1 tablespoon (7g) lemon juice powder
- 12 tablespoons (170g) unsalted butter, at room temperature
- 5 large egg whites (about 150g), at room temperature
- 1 1/4 cups (283g) buttermilk, at room temperature
- 1/4 cup (50g) vegetable oil
- 1 tablespoon (14g) vanilla extract
- 1/2 teaspoon almond extract
- 1 teaspoon white vinegar
Ingredient Notes
- Cake Flour: It’s key for that soft, tender crumb. Don’t have any? Just mix 2½ cups of all-purpose flour with ¼ cup of cornstarch as a simple substitute.
- Buttermilk: Adds moisture and tang. Make your own by combining 1 1/4 cups milk with 1 tablespoon lemon juice or vinegar; let sit for 5 minutes.
- Egg Whites: Use packaged egg whites if you don’t want to separate eggs. Save yolks for another recipe, like custard.
- Vanilla Extract: Splurge on high-quality extract for the best flavor.
- Substitutions:
- Gluten-Free: Use a gluten-free cake flour blend, but texture may vary slightly.
- Dairy-Free: Swap butter for vegan butter and use almond milk with lemon juice for buttermilk.
- Egg-Free: Try aquafaba (3 tablespoons per egg white), but note the texture may be denser.
Equipment Needed
You’ll need the following tools to make this White Velvet Cake:
- Two 8-inch round cake pans (at least 2 inches deep)
- Parchment paper or silicone liners
- Stand mixer or hand mixer
- Mixing bowls
- Whisk
- Spatula
- Cooling rack
- Cake strips (optional, for even baking)
Alternatives: If you don’t have 8-inch pans, use 9-inch pans, but reduce baking time by 5-7 minutes. A hand mixer works if you don’t have a stand mixer, though it may take longer to achieve a smooth batter.
Step-by-Step Instructions
Follow these clear, numbered steps to create your White Velvet Cake. Each step includes tips and visual cues to ensure success.
- Preheat the Oven: Set your oven to 350°F (175°C). Position a rack in the center for even baking.
- Prepare the Pans: Grease two 8-inch round cake pans, line with parchment paper, and grease the parchment. If using cake strips, soak them in cold water and wrap around the pans to prevent doming.
- Mix Dry Ingredients: In a stand mixer bowl, whisk together cake flour, cornstarch, sugar, salt, baking powder, baking soda, and lemon juice powder (if using). Sifting ensures no lumps. Tip: Fresh baking powder and soda are crucial for proper rise; test if over 6 months old.
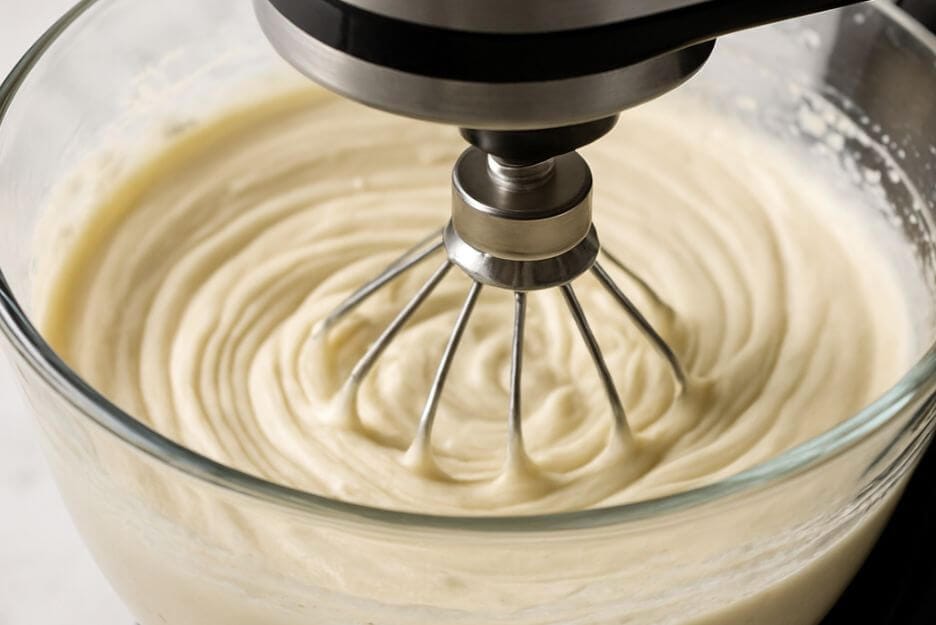
- Add Butter: Add room-temperature butter to the dry ingredients. Beat on low speed until the mixture resembles coarse sand, about 1-2 minutes. This reverse creaming method coats flour with fat, creating a tender crumb.
- Prepare Wet Ingredients: In a separate bowl, whisk egg whites until frothy, about 30 seconds. Add buttermilk, vegetable oil, vanilla extract, almond extract, and vinegar. Mix until combined. Tip: Room-temperature ingredients blend better, preventing a lumpy batter.
- Combine Wet and Dry: With the mixer on low, slowly pour the wet ingredients into the dry. Once combined, increase to medium speed and beat for 2 minutes until smooth and fluffy. The batter should look light and airy.
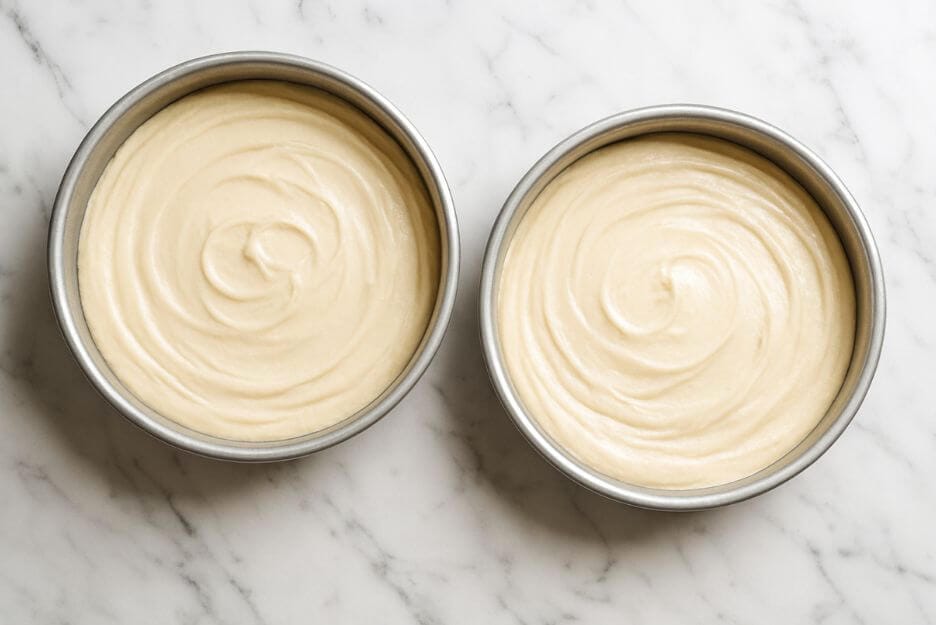
- Divide the Batter: Evenly divide the batter between the pans (about 720g per pan). Smooth the tops with a spatula. Tip: Weighing ensures even layers for a professional look.
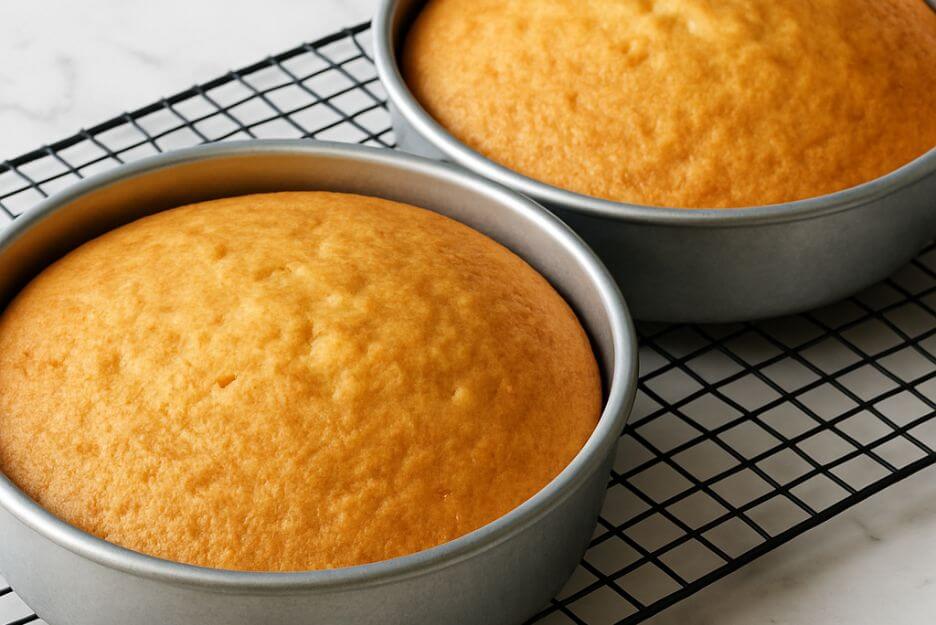
- Bake: Bake for 35-40 minutes, or until the cakes are golden brown and a toothpick inserted in the center comes out clean. The internal temperature should reach 204°F (95°C). Tip: Check at 30 minutes to avoid overbaking.
- Cool: Let cakes cool in pans for 10 minutes, then transfer to a wire rack to cool completely before frosting. Tip: Cooling completely prevents frosting from melting.
Expert Tips & Variations
To make your White Velvet Cake truly shine, try these expert tips and variations, inspired by top white velvet cake recipes:
- Sift Dry Ingredients: Sifting aerates the flour, ensuring a light texture.
- Don’t Overmix: After combining wet and dry ingredients, mix just until smooth to avoid a tough cake.
- Use Cake Strips: These prevent doming, giving you flat layers for easy stacking.
- Check Doneness Early: Ovens vary, so test with a toothpick or thermometer to avoid dryness.
- Level Layers: Use a serrated knife to trim domed tops for a polished look.
- Chill Before Frosting: Refrigerate layers for 30 minutes to make frosting easier.
- Variation – Funfetti: Fold in 1/4 cup sprinkles for a festive twist.
- Variation – Flavor Twists: Try coconut or orange extract instead of almond for a unique flavor.
Common Mistakes to Avoid:
- Overbaking: Leads to a dry cake. Check early and remove as soon as done.
- Cold Ingredients Can Lead to Lumps: Let butter, eggs, and buttermilk come to room temperature for about 30 minutes before using.
- Incorrect Measuring: Use a scale for accuracy, especially for flour and sugar.
Nutritional Information
Here’s an approximate nutritional breakdown per slice (based on 12 servings):
| Nutrient | Amount per Serving |
|---|---|
| Calories | 350 kcal |
| Protein | 4g |
| Carbohydrates | 50g |
| Fat | 15g |
| Sugar | 30g |
Health Benefits:
- Buttermilk: Provides calcium and probiotics, supporting bone and gut health.
- Egg Whites: Offer protein and are low in fat, contributing to muscle maintenance.
Storage & Reheating Instructions
- Room Temperature: Store unfrosted layers, well-covered, for up to 3 days. Frosted cake lasts 2 days at room temperature.
- Refrigeration: Store frosted cake in an airtight container in the fridge for up to 5 days.
- Freezing: Wrap unfrosted layers tightly in plastic wrap and foil; freeze for up to 3 months. Thaw at room temperature before frosting.
- Reheating: Not typically needed, but warm a slice in the microwave for 10-15 seconds for a fresh-baked feel.
Serving Suggestions
Elevate your White Velvet Cake with these ideas:
- Side Dishes: Serve with fresh berries, a scoop of vanilla ice cream, or whipped cream for a decadent treat.
- Garnishes: Dust with powdered sugar, add edible flowers, or sprinkle with chocolate shavings for elegance.
- Beverage Pairings: Pair with coffee, tea, or a glass of cold milk to complement the cake’s sweetness.
Frequently Asked Questions
Here are answers to common questions about White Velvet Cake:
- What’s the difference between White Velvet Cake and Red Velvet Cake?
White Velvet Cake omits the red food coloring and cocoa powder found in Red Velvet, resulting in a bright white cake with a pure vanilla and buttermilk flavor. - Can I make this cake gluten-free?
Yes, use a gluten-free cake flour blend. The texture may be slightly denser, so follow package instructions for best results. - How do I store White Velvet Cake?
Unfrosted layers can be stored at room temperature for 3 days or frozen for 3 months. Frosted cake lasts 2 days at room temperature or 5 days in the fridge. - Can I just use whole eggs instead of only the whites?
Whole eggs will add a yellow tint and denser texture, altering the classic White Velvet look and feel. Stick to egg whites for authenticity. - What frosting pairs best with White Velvet Cake?
Cream cheese or ermine frosting are traditional choices. Buttercream or whipped cream frosting also work well. Try recipes from King Arthur Baking. - Can I add food coloring to the batter?
Absolutely! Add a few drops of gel food coloring to create blue, pink, or other colored velvet cakes for fun variations. - Why is my cake dry?
Overbaking is a common culprit. Check for doneness at 30 minutes and ensure accurate oven temperature. Using room-temperature ingredients also helps retain moisture.
This White Velvet Cake is a must-try for any baking enthusiast. Its soft, velvety texture and delightful flavor make it perfect for birthdays, weddings, or any special occasion. By using the five secrets—reverse creaming method, cake flour, buttermilk, egg whites, and a butter-oil blend—you’ll achieve bakery-style results at home. Gather your ingredients, follow these steps, and enjoy the joy of baking a cake that’s sure to impress. Happy baking!