Red Velvet Cookies With Cake Mix: How to Get Perfect Cracks
Imagine pulling a tray of stunning red velvet cookies with cake mix from the oven. Their perfectly cracked tops shine with a warm, inviting sheen. This moment of baking magic is closer than you think, thanks to this simple cake mix cookies technique. Whether you’re a novice baker or a seasoned pro, making irresistible red velvet cookies is easier than ever.
The red velvet cookies recipe turns a basic cake mix into a delicious treat. It looks like it came straight from a professional bakery. With just a few simple ingredients and some clever baking tricks, you’ll learn to make cookies with those Instagram-worthy surface cracks that make everyone’s mouth water.
Baking these cake mix cookies is more than following a recipe—it’s about creating moments of joy. Each bite offers a rich, velvety experience that connects you to a cherished culinary tradition. Get ready to discover how simple it can be to wow your friends and family with these stunning red velvet cookies.
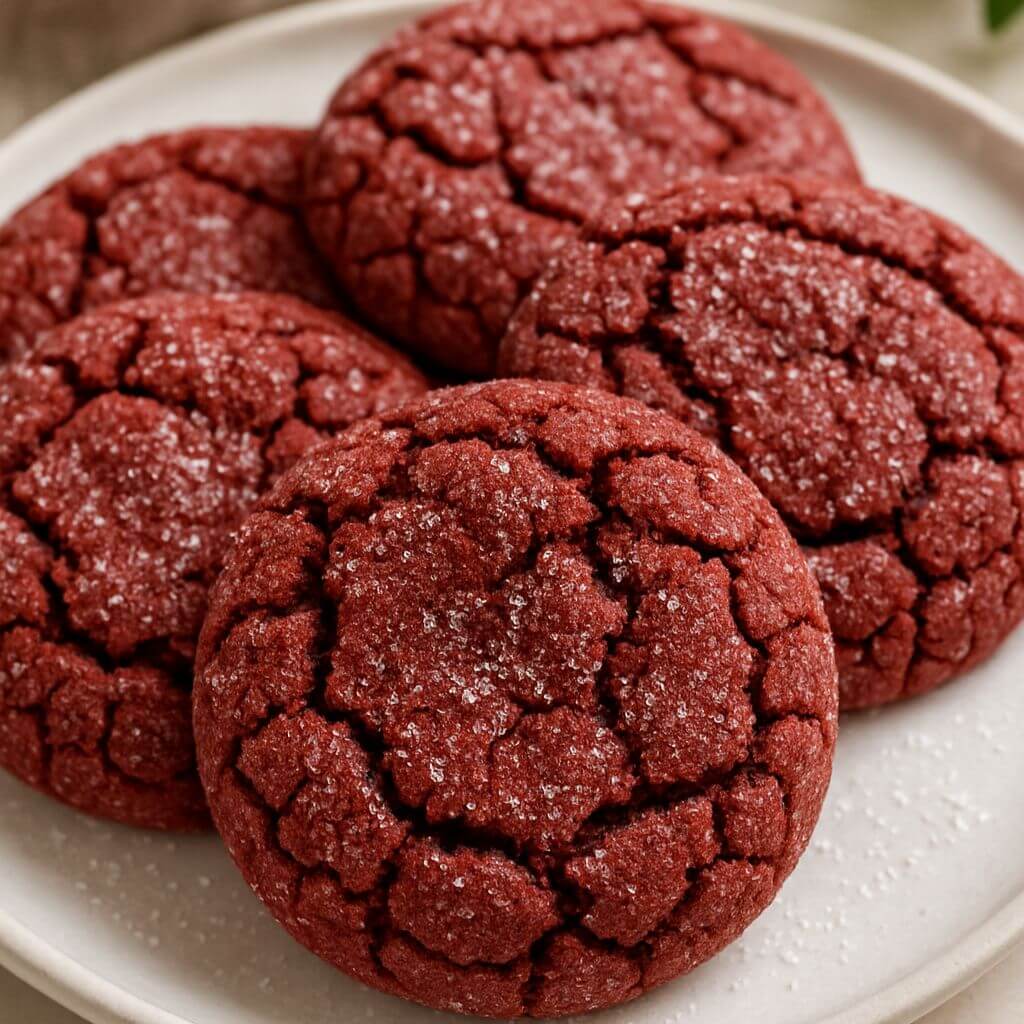
Table of Contents
Why Red Velvet Cookies Are the Perfect Treat
Tracing the Culinary Origins
The tale of red velvet desserts started in the early 1900s. The red color came from cocoa powder and buttermilk. This mix gave cakes and pastries a unique red hue.
- 1930s: Red velvet cake became popular during the Great Depression
- 1940s: Food coloring became common to deepen the red color
- 2000s: Red velvet cookies became a trendy choice
What Makes Red Velvet Unique
Red velvet cookies are more than just a pretty face. They have a complex flavor that’s different from chocolate cookies. The mix of cocoa, buttermilk, and a bit of tanginess makes them unforgettable.
These cookies have several special qualities:
- Subtle chocolate flavor that’s not too strong
- Vibrant red color that catches the eye
- Soft, tender texture like classic red velvet cake
Red velvet cookies are like a culinary canvas, blending tradition with modern baking creativity.” – Pastry Chef Sarah Reynolds
Whether you love baking or just enjoy tasty treats, red velvet cookies are special. They offer a unique and delightful experience that’s loved by many across the country.
Essential Ingredients for Red Velvet Cookies with Cake Mix
Choosing the right ingredients turns a simple dessert into a special treat. Here’s what you’ll need:
- Red velvet cake mix (Duncan Hines or Betty Crocker recommended)
- All-purpose flour
- Unsalted butter
- Large eggs
- Vanilla extract
- Cream cheese (optional but recommended)
Quality is key when picking your ingredients. Fresh, room-temperature ingredients make the best cookies.
| Ingredient | Purpose | Recommended Quantity |
|---|---|---|
| Red Velvet Cake Mix | Base flavor and color | 1 box (15.25 oz) |
| Butter | Moisture and richness | 1/2 cup, softened |
| Eggs | Binding and structure | 2 large eggs |
| Vanilla Extract | Enhanced flavor | 1 teaspoon |
The secret to amazing cake mix cookies is understanding how each ingredient contributes to the final texture and taste. – Professional Baker
If you have dietary needs, you can swap out ingredients. Use gluten-free cake mix or different sweeteners. Make sure your ingredients are fresh and stored well for the best cookies.
Kitchen Tools and Equipment You’ll Need
To make red velvet cookies with cake mix, you need the right tools.The right tools make baking easier and way more fun Whether you’re new to baking or experienced, the right tools matter a lot for your cookies.
Baking red velvet cookies is an art that starts with the right tools. Your kitchen tools will affect the quality and taste of your treats.
Must-Have Baking Essentials
- Large mixing bowl (preferably stainless steel)
- Measuring cups and spoons
- Baking sheets with non-stick surface
- Rubber spatula
- Wire cooling rack
- Parchment paper
Optional Tools for Better Results
These tools are not essential but can make your cookies better:
| Tool | Benefit |
|---|---|
| Stand Mixer | Ensures perfect ingredient integration |
| Silicone Baking Mat | Provides even heat distribution |
| Cookie Scoop | Creates uniform cookie sizes |
| Digital Kitchen Scale | Precise ingredient measurements |
Quality baking tools can make your red velvet cookies amazing. Each tool is important for making cookies that are perfectly moist and delicious.
Tips for Choosing the Right Red Velvet Cake Mix
Choosing the right red velvet cake mix is key for your cake mix cookies. Not all mixes are the same. Understanding what to look for can level up your baking.
When you’re shopping for red velvet cake mix, keep these points in mind:
- Ingredient Quality: Opt for mixes with natural food coloring
- Color Intensity: Look for mixes that give a deep red color
- Flavor Profile: Choose mixes with a good cocoa taste
- Brand Reputation: Pick trusted brands for consistent results
Brands like Duncan Hines and Betty Crocker make great red velvet cake mixes for cookies. Pro tip: Check the ingredient list for real cocoa powder instead of artificial flavors.
Some bakers like organic or gluten-free mixes for their red velvet cookies. These options offer unique tastes and textures and meet special dietary needs.
The secret to amazing cake mix cookies is finding a mix that balances flavor, color, and texture perfectly.
When comparing mixes, look at:
- Sugar content
- Cocoa percentage
- Coloring ingredients
- Potential allergens
Your red velvet cookies recipe needs a top-notch cake mix. This will make your treats delicious and beautiful every time.
Step-by-Step Mixing Instructions
Making the perfect red velvet cookies recipe needs precision and care. You must know the right techniques and how to handle ingredients. This guide will help you through each step for delicious results.
Start by preparing your ingredients carefully. Room temperature ingredients are key for the right texture and consistency.
Proper Ingredient Temperature Guidelines
Temperature is important when making your red velvet cookies. Here are some temperature tips:
- Butter should be softened (not melted) at room temperature
- Eggs must be at room temperature for better incorporation
- Cream cheese should be softened but still cool
Mixing Techniques for Perfect Consistency
To get the right dough consistency, use these mixing techniques:
- Cream butter and sugar until light and fluffy
- Add eggs one at a time, mixing thoroughly
- Gradually incorporate dry ingredients
- Mix until just combined to prevent overmixing
Look for visual cues during mixing. Your dough should be smooth, uniform in color, and hold together well. Avoid overmixing to keep cookies soft and not tough.
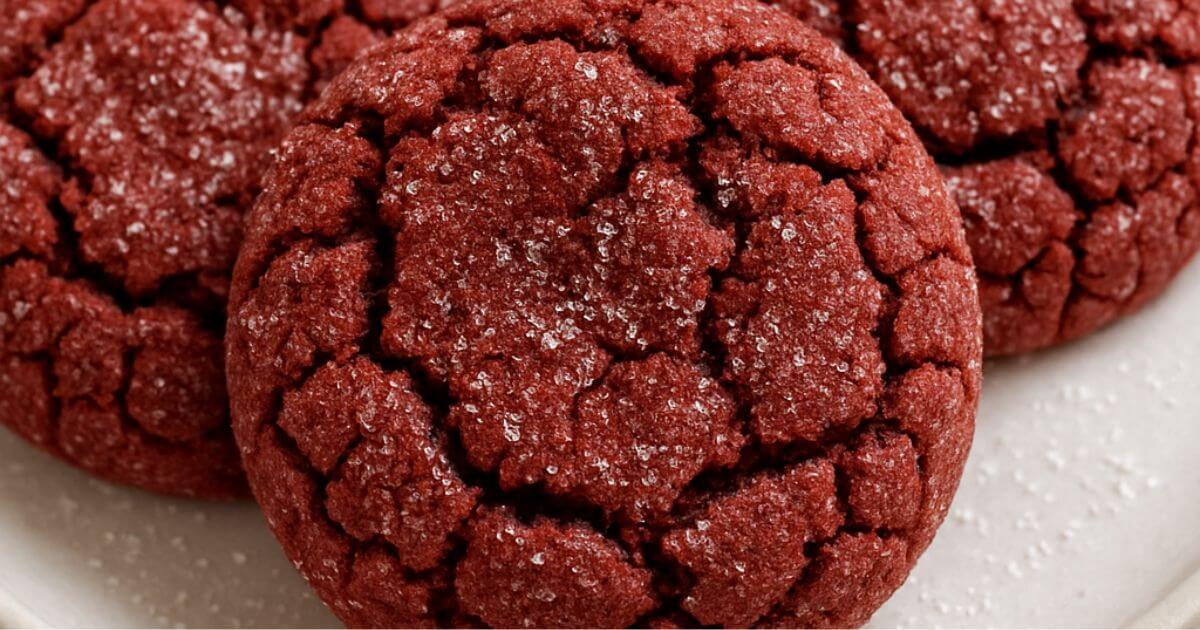
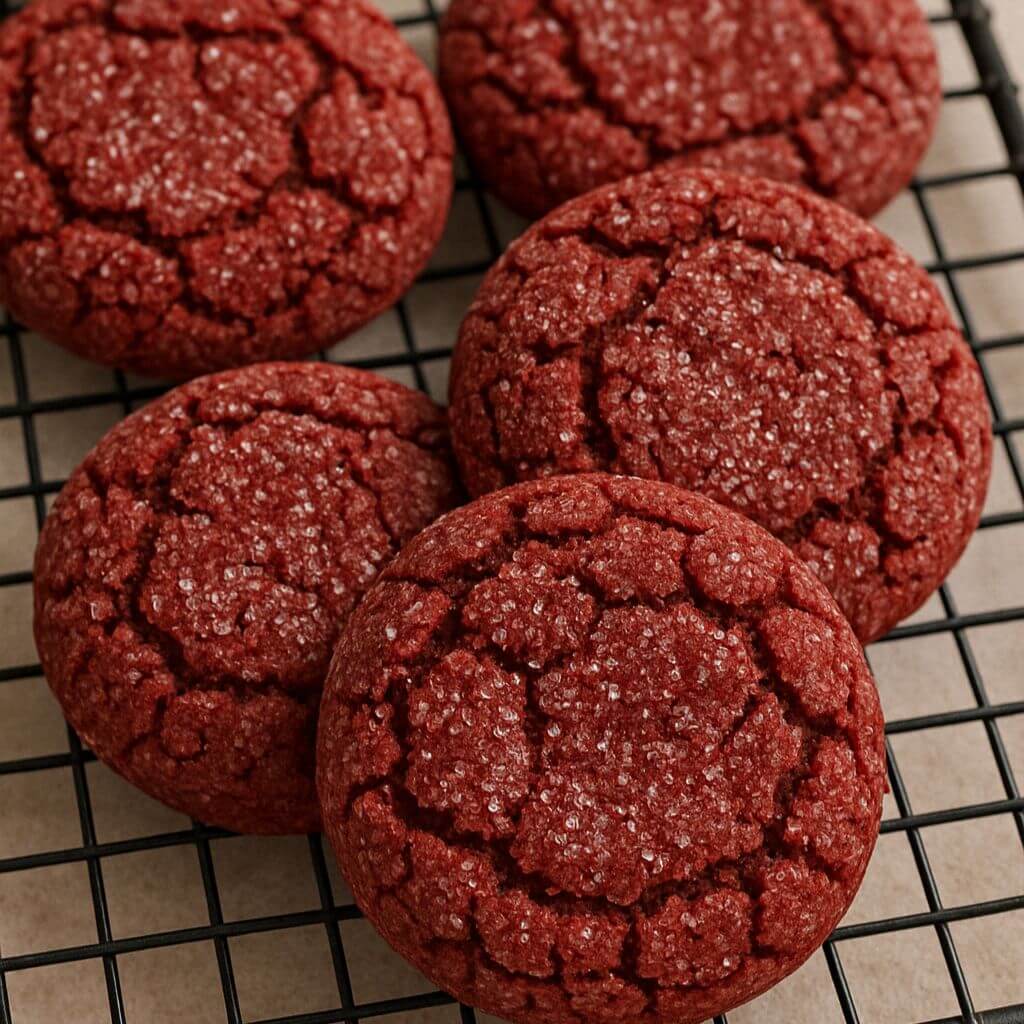
The Secret to Achieving Perfect Cracks
Getting those perfect cracks on your red velvet cookies isn’t luck. It’s a science that needs precision and understanding of baking. Mastering a few techniques can turn your cookies from flat to fabulous.
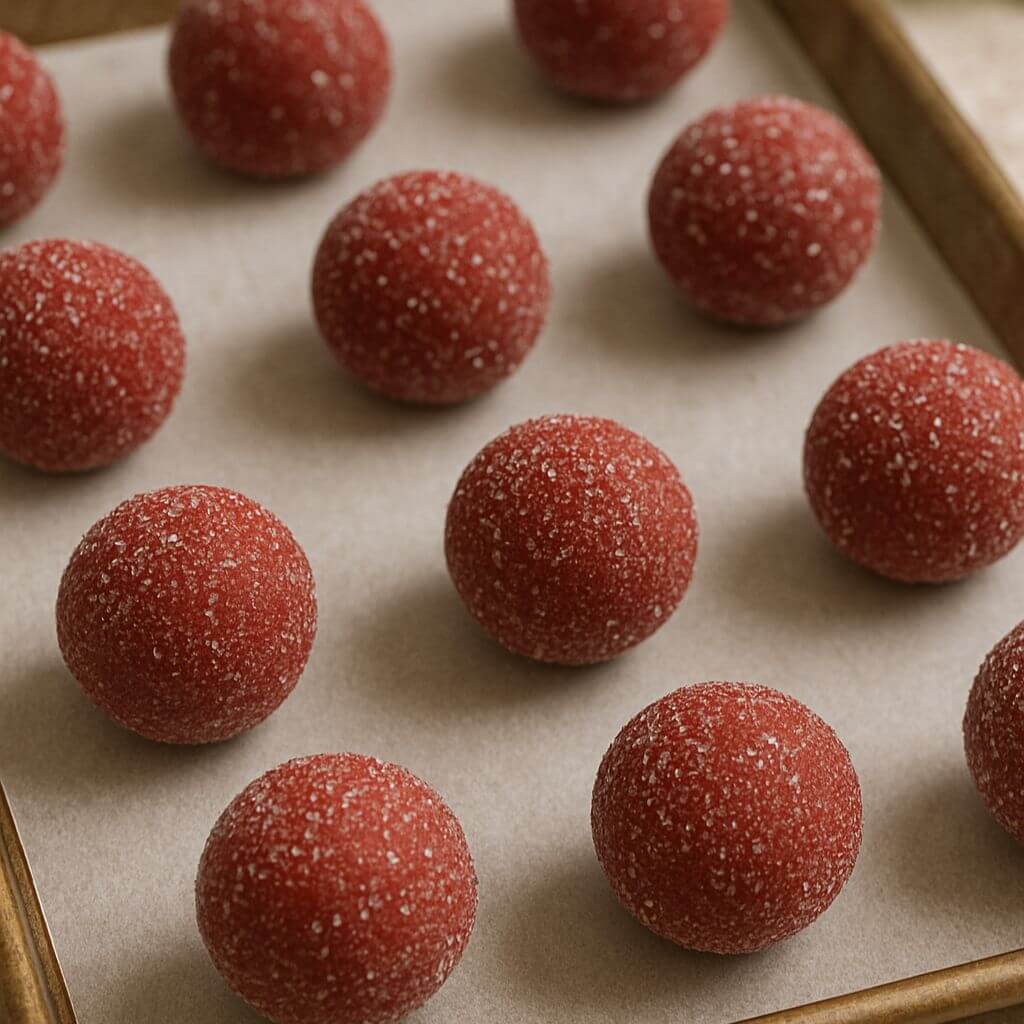
Temperature is key for those signature cracks. Chill your dough before baking. This helps control spread and encourages cracking.
- Chill dough for 30-60 minutes before baking
- Roll cookie dough balls in granulated sugar
- Use room temperature ingredients
- Avoid overmixing the cake mix cookie dough
Your oven’s heat is also crucial. Preheat to 350°F for cake mix cookies. A hot oven causes rapid expansion, leading to those perfect cracks.
| Technique | Crack Formation Impact |
|---|---|
| Dough Chilling | High – Prevents excessive spreading |
| Sugar Rolling | Medium – Creates surface texture |
| Oven Temperature | High – Triggers rapid expansion |
Pro tip: Gently press down on cookie dough balls before baking. This slight flattening helps in getting more uniform cracks. Remember, practice makes perfect!
Baking Temperature and Timing Guidelines
Getting your red velvet cookies just right is all about the baking. The perfect temperature and timing make all the difference. With these tips, you’ll be baking like a pro every time.
Baking red velvet cookies needs your full attention. Since different ovens bake differently, knowing your oven is key.
Signs Your Red Velvet Cookies Are Perfectly Baked
Knowing when your cookies are done is important. Look for these signs:
- Edges should appear slightly firm and golden
- Centers remain soft and slightly jiggly
- Surfaces develop subtle cracking patterns
- Cookies maintain a vibrant red color
Optimal Cooling Process
Cooling your cookies is just as important as baking. Here’s how to do it right:
- Let cookies rest on the baking sheet for 3-5 minutes
- Transfer carefully to a wire cooling rack
- Allow complete cooling for 15-20 minutes
| Oven Temperature | Baking Time | Cookie Texture |
|---|---|---|
| 350°F | 8-10 minutes | Soft, slightly crisp edges |
| 375°F | 6-8 minutes | Crisp exterior, gooey center |
Pro tip: Always use an oven thermometer to ensure accurate temperature readings for your red velvet cookies recipe.
Common Mistakes to Avoid When Making Red Velvet Cookies
Baking perfect cake mix cookies, especially red velvet cookies, can be tricky for home bakers. Knowing common pitfalls can help you create delectable treats every time.
When preparing red velvet cookies, several key mistakes can derail your baking success. Precise measurements and techniques are crucial to achieving that picture-perfect result.
- Overmixing the Dough: Mixing cake mix cookies too aggressively can lead to tough, dense cookies. Gently fold ingredients until just combined.
- Incorrect Ingredient Temperatures: Using cold eggs or butter can prevent proper incorporation and affect cookie texture.
- Skipping Parchment Paper: Not using parchment paper can cause uneven baking and sticky cookie bottoms.
Temperature control is another critical aspect of creating stunning red velvet cookies. An oven that’s too hot or too cold can ruin your batch.
| Mistake | Consequence | Solution |
|---|---|---|
| Overmixing | Tough, dense cookies | Mix until ingredients are just combined |
| Wrong Oven Temperature | Uneven baking | Preheat oven and use an oven thermometer |
| Improper Measuring | Dry or flat cookies | Use exact measurements and level ingredients |
By understanding these common pitfalls, you’ll be well-equipped to create delicious red velvet cookies that are sure to impress family and friends.
Storage Tips and Shelf Life
Keeping your red velvet cookies fresh is key. The right storage methods help them stay delicious for a long time.
Storing your cookies right is crucial. They deserve care to stay fresh and tasty.
Freezing and Thawing Techniques
Freezing is a great way to keep your cookies fresh. Here’s how to do it right:
- Cool cookies completely before freezing
- Wrap individual cookies in plastic wrap
- Place wrapped cookies in freezer-safe containers
- Store frozen cookies for up to 3 months
Optimal Storage Containers
The right container makes a big difference. It keeps your cookies fresh and tasty.
| Container Type | Best For | Storage Duration |
|---|---|---|
| Airtight Plastic Container | Room Temperature Storage | 3-5 Days |
| Glass Jar with Tight Lid | Short-Term Storage | 2-4 Days |
| Freezer-Safe Container | Long-Term Preservation | Up to 3 Months |
The secret to great cookies is not just in baking, but in how you store them! – Professional Baker
To thaw frozen cookies, take them out and let them sit at room temperature for 30 minutes. This keeps them soft and flavorful.
Pro tip: Always store your red velvet cookies in a cool, dry place away from direct sunlight to preserve their perfect taste and appearance.
Creative Variations and Toppings
Turn your basic red velvet cookies into something special with these creative ideas. Your cake mix cookies can be a blank canvas for your culinary creativity. This lets you play with flavors and make them even better.
Mix-In Ingredients to Enhance Red Velvet Cookies
- Chocolate chips (milk, dark, or white)
- Chopped nuts like pecans or walnuts
- Dried cherries or cranberries
- Mini marshmallows
- Cream cheese chunks
Red velvet cookies are incredibly versatile. Adding unexpected ingredients can lead to unique flavors that will amaze you.
Delectable Topping Options
Try these delicious toppings to elevate your red velvet cookies:
- Cream cheese glaze
- White chocolate drizzle
- Powdered sugar dusting
- Crushed candy cane (for holiday version)
Seasonal Variations
Make your red velvet cookies special for different times of the year:
| Season/Holiday | Unique Modification |
|---|---|
| Valentine’s Day | Heart-shaped cutouts with pink sprinkles |
| Christmas | Peppermint extract, red and green sprinkles |
| Summer | Lemon zest, light cream cheese frosting |
Try these variations to keep your red velvet cookies fresh and exciting. Each change adds a new twist to the classic recipe.
Troubleshooting Your Red Velvet Cookie Problems
Baking red velvet cookies with cake mix can sometimes present challenges. Understanding common issues will help you create perfect cookies every time. Let’s explore some frequent problems and their solutions.
Common Red Velvet Cookie Baking Challenges
- Cookies spreading too much during baking
- Cookies not spreading enough
- Uneven color or texture
- Burnt edges or bottoms
When your red velvet cookies recipe doesn’t turn out as expected, several factors could be at play. Temperature, ingredient measurements, and mixing techniques all impact the final result.
Troubleshooting Guide
| Problem | Possible Cause | Solution |
|---|---|---|
| Cookies spreading too much | Butter too soft | Chill dough for 30 minutes before baking |
| Cookies not spreading | Dough too cold | Let dough sit at room temperature for 10 minutes |
| Pale color | Insufficient food coloring | Add extra red food coloring gradually |
Pro tip: Always measure ingredients precisely and follow the red velvet cookies recipe instructions carefully.
Perfecting your baking skills takes practice and patience!” – Professional Baker
Quick Fixes for Red Velvet Cookie Issues
- Check oven temperature with a reliable thermometer
- Use fresh ingredients
- Avoid overmixing the dough
- Allow proper cooling time
By understanding these troubleshooting techniques, you’ll be well-equipped to create delicious red velvet cookies that look and taste amazing.
Conclusion
Baking red velvet cookies with cake mix is a fun journey. It turns a simple dessert into a tasty treat. You’ll impress everyone with your skills in making these vibrant cookies.
It’s easy to start, and with practice, you’ll get better at making perfect cookies. Your creativity can also shine by trying new things. Add unique toppings or mix in extra ingredients to make them your own.
Red velvet cookies are a blank canvas for your baking ideas. You can try new flavors and decorations. Baking is both a science and an art. Each batch teaches you something new.
Don’t be afraid to try new things and adjust your recipes. Share your baking stories with others. Swap tips and enjoy the yummy results of your creativity.
These red velvet cake mix cookies are perfect for anyone, whether you’re new to baking or experienced. Enjoy the process, have fun, and relish every delicious bite of your homemade cookies.
FAQ
Can I make these cookies with any red velvet cake mix?
Most red velvet cake mixes work well. But Duncan Hines and Betty Crocker are top choices. They have a deep red color and a hint of chocolate for the best taste.
How do I prevent my red velvet cookies from spreading too much?
Chill the dough for 30-60 minutes to stop spreading. Make sure your butter is not too soft. Use parchment paper or a silicone mat for baking.
Can I make these cookies gluten-free?
Yes! Use gluten-free mixes from Pamela’s or King Arthur Baking. Just swap the regular mix for a gluten-free one and follow the recipe.
How long will these red velvet cookies stay fresh?
Keep them in an airtight container at room temperature for 4–5 days. For longer storage, freeze them for up to 3 months.
Can I use cream cheese frosting on these cookies?
Absolutely! Cream cheese frosting is a perfect match for red velvet. You can pipe it on top or make sandwich cookies with it.
What causes the characteristic cracks on top of red velvet cookies?
The cracks come from rolling the dough in sugar and baking at the right temperature. The sugar creates tension that leads to those beautiful cracks.
Can I make the cookie dough ahead of time?
Yes! Prepare the dough and refrigerate it for up to 3 days. Freeze the dough balls for up to 3 months. Bake them straight from frozen with a bit more time.
Are red velvet cookies very chocolatey?
Red velvet cookies have a mild chocolate taste. They use a small amount of cocoa powder. They’re not as chocolatey as other cookies but have a nice, subtle flavor.