How to Make Yellow Cake with Chocolate Icing Fast
Picture this: the sweet aroma of vanilla and butter dancing through your kitchen while a golden, fluffy cake rises to perfection in your oven. That’s exactly what you’ll experience when you make this incredible yellow cake with chocolate icing that’s ready in under an hour from mixing bowl to final bite.
This beloved dessert has deep roots in American home baking, emerging during the mid-1800s when refined sugar and vanilla became more accessible to everyday cooks. The gorgeous golden color comes from using whole eggs rather than just whites, creating that signature sunny appearance that makes this cake so visually appealing. What started as a celebration cake for special occasions quickly became a family favorite across the country.
Here’s what makes this yellow cake recipe absolutely brilliant: it delivers maximum flavor with minimal fuss. You’ll spend less than 15 minutes mixing, about 30 minutes baking, and the rest is just waiting for that magical transformation in your oven. This approach saves you time without cutting corners on taste or texture.
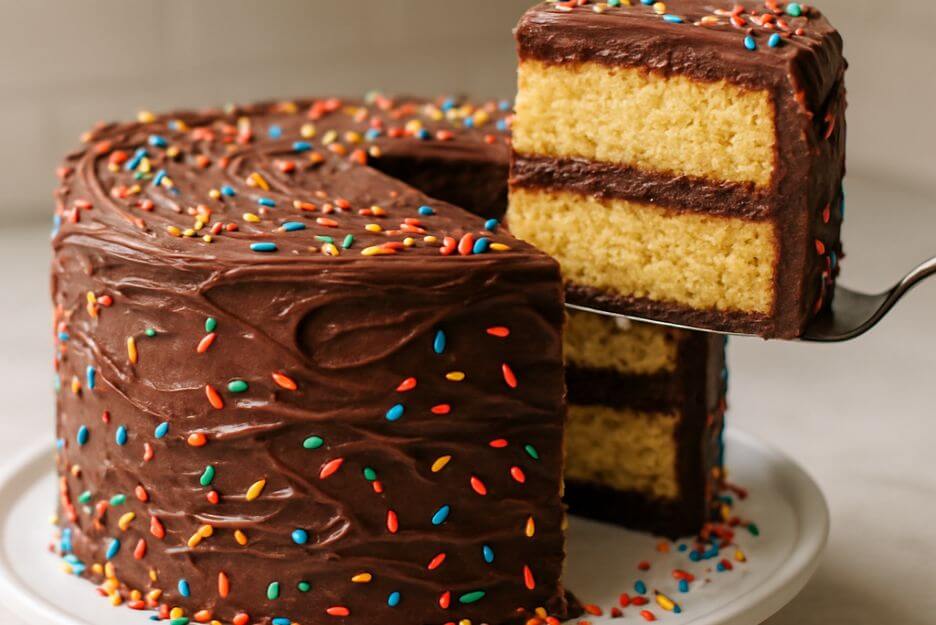
The magic happens when tender, vanilla-scented cake meets rich, creamy chocolate icing. This flavor combination has stood the test of time because it simply works – the bright, buttery notes of the cake create the perfect canvas for indulgent chocolate sweetness. Every forkful delivers comfort and joy in equal measure.
Whether you’re celebrating a birthday, bringing dessert to a gathering, or simply treating yourself to something special, this yellow cake with chocolate icing will exceed your expectations. Let’s dive into creating this show-stopping dessert together.
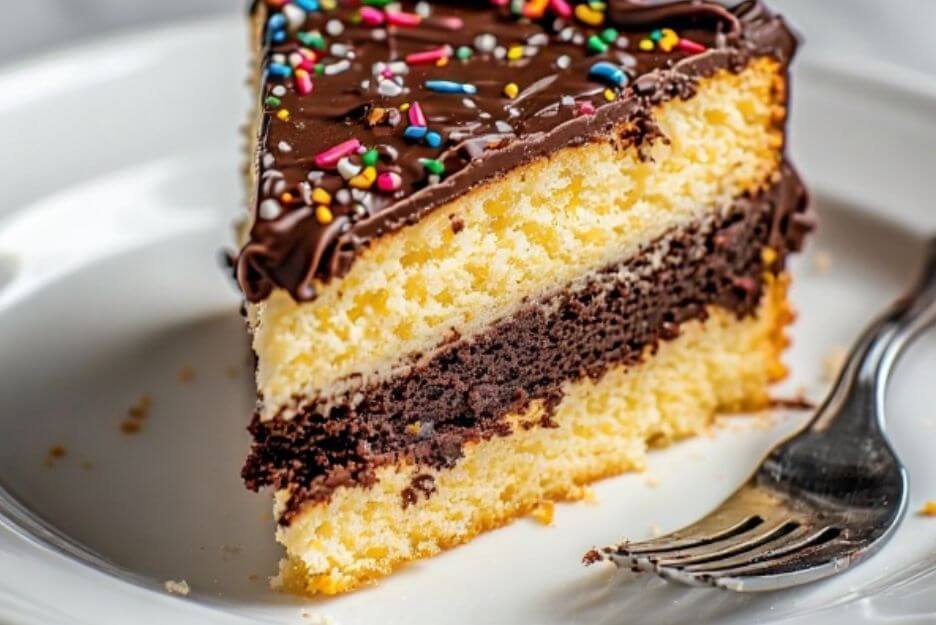
Table of Contents
Complete Ingredient List for yellow cake with chocolate icing
Yellow Cake Base:
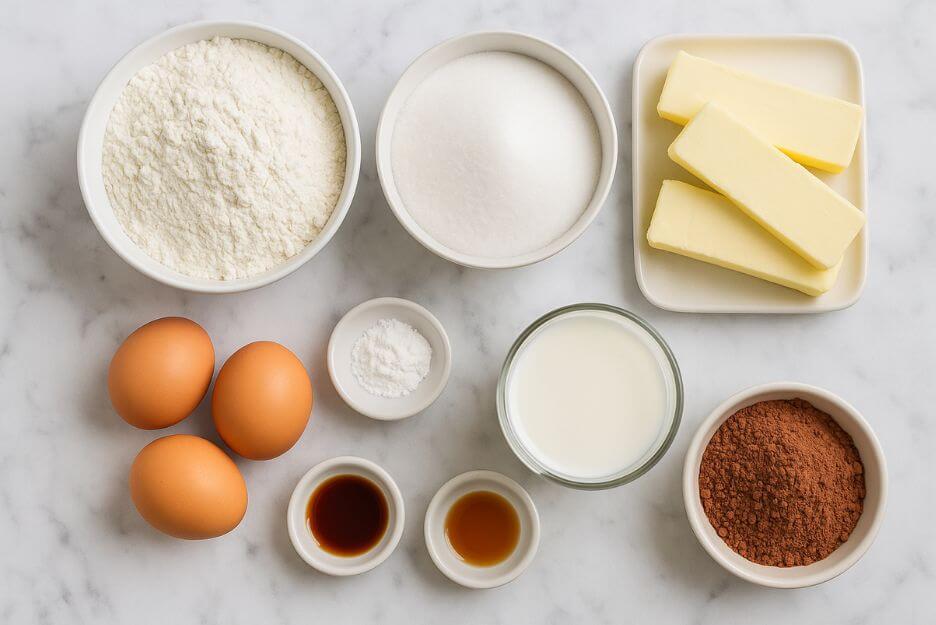
- 2¾ cups all-purpose flour (sifted for extra lightness)
- 1¾ cups white granulated sugar
- ¾ cup butter, brought to room temperature
- 3 whole eggs (room temperature works best)
- 2½ teaspoons fresh baking powder
- 1 teaspoon fine sea salt
- 1¼ cups whole milk (room temperature)
- 2 teaspoons premium vanilla extract
- ½ teaspoon almond extract (enhances the vanilla beautifully)
Rich Chocolate Icing:
- ½ cup butter, softened to perfection
- ⅔ cup pure unsweetened cocoa powder
- 3 cups confectioner’s sugar
- ⅓ cup whole milk
- 1 teaspoon vanilla extract
- Small pinch of sea salt
Smart Substitution Options:
Plant-Based Version: Swap regular butter for high-quality vegan butter and use your favorite non-dairy milk. The result stays wonderfully moist and flavorful.
Wheat-Free Option: Replace regular flour with a premium gluten-free baking blend that includes binding agents. Check that it’s designed for 1:1 substitution.
Reducing Sweetness: Cut sugar by up to ⅓ cup if you prefer less sweetness, though this will slightly change the tender texture.
Egg-Free Alternative: Three tablespoons of chickpea liquid (aquafaba) can replace each egg, creating a different but still delightful texture.
Ingredient Quality Notes: Premium vanilla extract and real butter make a noticeable difference in final flavor.
Essential Baking Tools and Equipment
Primary Equipment Needed:
- Pair of 9-inch circular cake pans
- Stand mixer or powerful hand mixer
- Multiple mixing bowls (various sizes)
- Cooling racks with good airflow
- Accurate measuring tools
- Flexible rubber spatula
- Fine-mesh strainer for flour
Alternative Solutions:
No Stand Mixer Available? A quality hand mixer does the job perfectly – just allow extra mixing time for proper incorporation.
Missing Cooling Racks? Clean kitchen towels work temporarily, though proper racks give better air circulation for even cooling.
Single Pan Setup? Bake your layers sequentially, keeping unused batter covered while the first layer completes its baking cycle.
Detailed Step-by-Step Baking Process
1. Set Up Your Baking Environment
Heat your oven to exactly 350°F (175°C). Coat your cake pans thoroughly with butter, then add a light dusting of flour, shaking out excess. This preparation ensures your moist yellow cake with chocolate icing releases cleanly every time.
2. Combine Your Dry Components
Whisk flour, baking powder, and salt together in a separate bowl until evenly distributed. This preliminary step ensures even rising and consistent texture throughout your finished cake.
3. Create the Butter-Sugar Foundation
Beat room-temperature butter with sugar using medium-high speed for approximately 4 minutes until the mixture becomes pale and noticeably fluffy. This creaming process incorporates air for a lighter final texture.
4. Incorporate Eggs and Flavorings
Add eggs individually, beating thoroughly after each addition. Pour in both vanilla and almond extracts. The mixture may appear slightly separated at this stage, which is perfectly normal.
5. Build Your Batter Structure
Add your flour mixture and milk in alternating additions, starting and finishing with flour. Mix only until you can no longer see flour streaks – excessive mixing creates tough, chewy results instead of tender crumb.
6. Fill Pans and Bake to Perfection
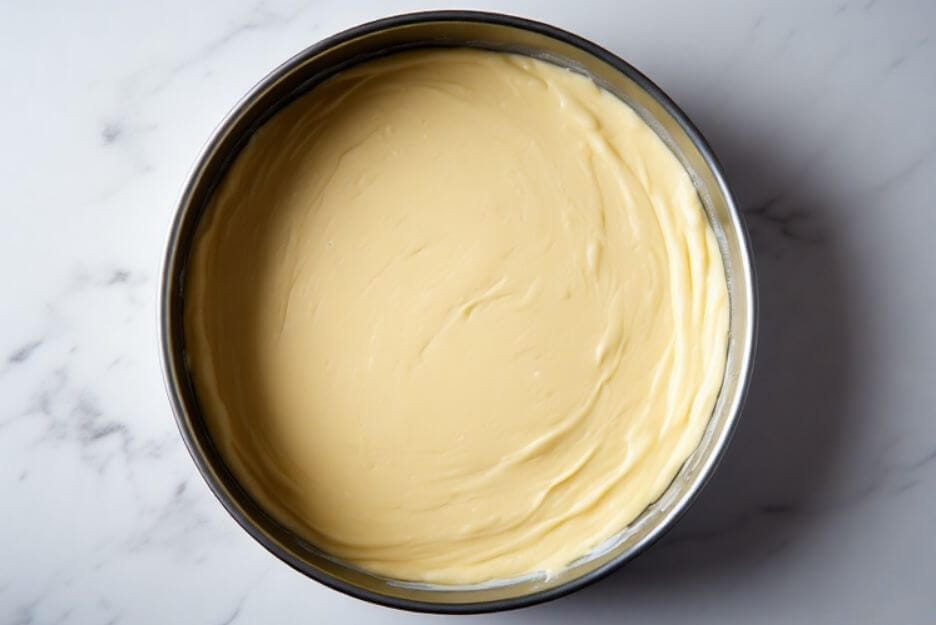
Distribute batter evenly between prepared pans using your spatula to level surfaces. Bake for 28-32 minutes until a wooden pick inserted centrally emerges clean and cake surfaces spring back when gently pressed.
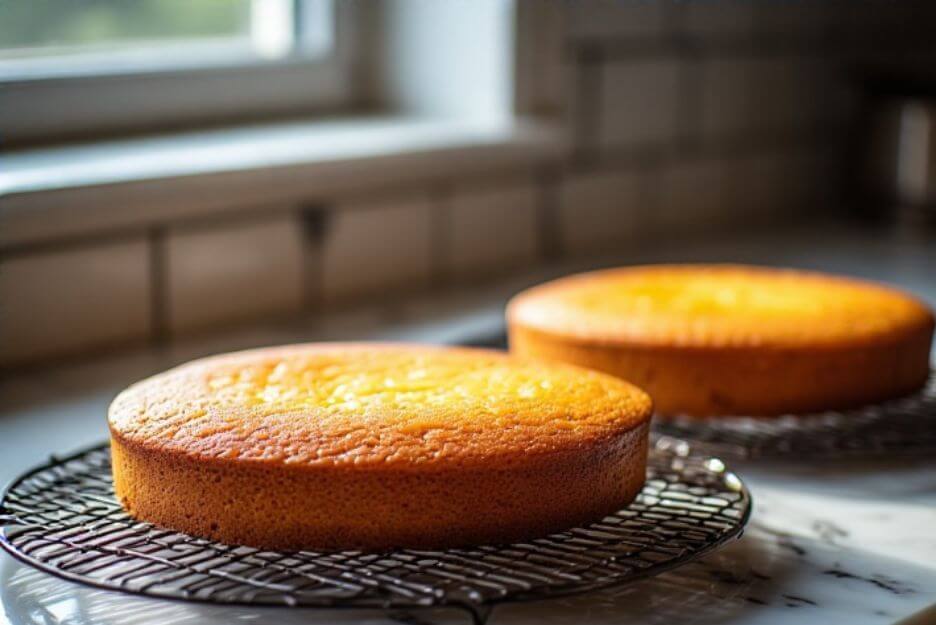
7. Cool Properly for Best Results
Allow cakes to rest in pans for exactly 10 minutes, then carefully invert onto cooling racks. Complete cooling is essential before applying frosting to your easy yellow cake with chocolate icing.
8. Prepare Silky Chocolate Icing
Beat softened butter until light and airy. Gradually incorporate cocoa powder, then alternate between powdered sugar and milk until achieving your preferred spreading consistency.
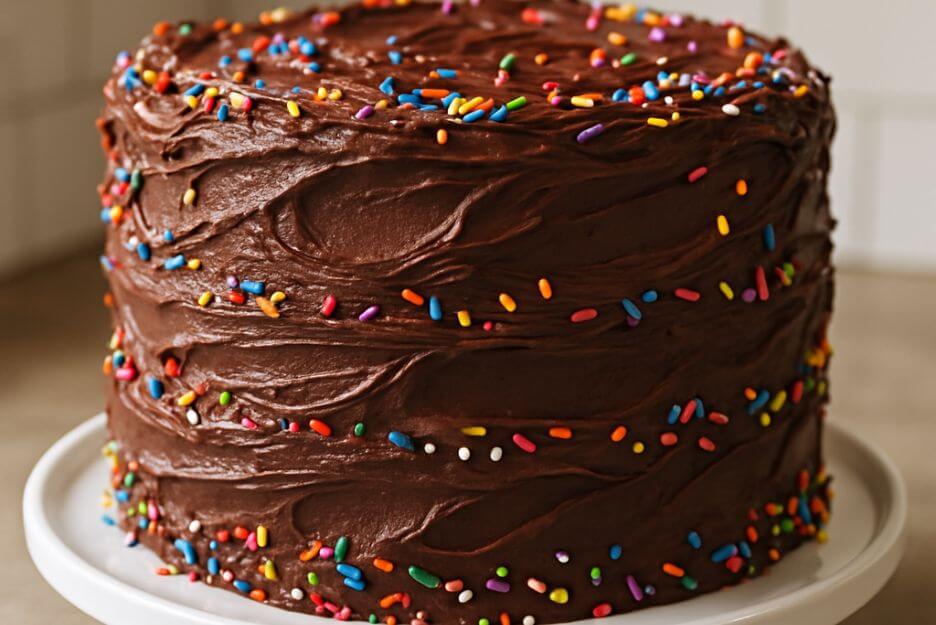
9. Assemble Your Masterpiece
Position bottom layer on serving plate, apply generous frosting layer, add top layer, then cover entire cake with remaining icing. Work patiently for professional-looking results.
Professional Baking Tips and Techniques For Yellow Cake
Temperature Control is Critical
Room temperature ingredients blend more easily and create superior texture. If you’ve forgotten to remove items from refrigeration, warm eggs gently in lukewarm water and briefly heat milk in your microwave.
Gentle Mixing Prevents Toughness
Once flour enters your mixture, stir just until combined. Aggressive mixing develops gluten excessively, resulting in dense, chewy texture rather than the tender crumb you’re seeking.
Multiple Doneness Indicators
Beyond the toothpick test, properly baked cake will spring back from gentle finger pressure and begin separating slightly from pan edges. Internal temperature should register around 210°F.
Achieving Perfect Icing Consistency
Too thick? Add milk gradually, one tablespoon per adjustment. Too thin? Incorporate additional powdered sugar slowly. Ideal consistency spreads smoothly while maintaining shape.
Avoiding Common Pitfalls
Never apply frosting to warm cake layers – heat will melt your icing instantly. Resist opening oven doors during initial 20 minutes of baking to prevent collapse. Measure flour by spooning into cups and leveling rather than scooping directly.
Make-Ahead Strategy
Finished cake layers can be tightly wrapped and stored at room temperature for 48 hours, or frozen up to three months for future use.
Professional Finishing Touches
Use offset spatulas for smooth frosting application and rotate your serving plate while working. A bench scraper creates perfectly even sides for bakery-quality appearance.
Detailed Nutritional Breakdown
Per Generous Serving (12 total servings):
- Energy: 485 calories
- Fat Content: 18 grams (includes 11g saturated)
- Cholesterol: 95 milligrams
- Sodium: 285 milligrams
- Carbohydrates: 78 grams (including 65g sugars)
- Fiber: 2 grams
- Protein: 6 grams
- Vitamin A: 12% daily value
- Calcium: 8% daily value
- Iron: 10% daily value
Nutritional Highlights from Key Ingredients
Whole eggs contribute complete proteins containing all essential amino acids while supporting cake structure and moisture retention. Dairy milk provides calcium for bone health plus additional protein content. Pure vanilla offers trace antioxidants and natural mood-enhancing compounds.
This yellow cake with chocolate icing represents an indulgent treat that can fit into balanced eating patterns when enjoyed mindfully and in appropriate portions.
Nutritional calculations are estimates based on standard ingredient databases. Actual values may differ based on specific product brands and preparation methods used.
Storage and Freshness Guidelines
Ambient Temperature Storage
Cover your completed cake with a protective dome or loose plastic wrap for up to 72 hours at room temperature. The chocolate frosting layer actually helps maintain cake moisture during storage.
Refrigerated Storage Options
While not required, refrigeration extends freshness up to one full week. Allow cake to return to room temperature for optimal flavor and texture before serving.
Freezing for Long-Term Storage
Complete Cake: Initial freeze uncovered for one hour, then wrap securely in plastic followed by aluminum foil. Maintains quality for up to three months frozen.
Individual Portions: Wrap single slices separately in plastic wrap and store in freezer bags. Perfect for portion control and quick individual treats.
Optimal Reheating Approaches
Thaw frozen portions at room temperature for 2-3 hours. For slightly warmed cake, use microwave in 10-second intervals. Avoid heating entire cakes as this will compromise frosting integrity.
Maintaining Peak Quality
Store away from strong odors and direct sunlight exposure. If frosting surface becomes dry, lightly mist with water and smooth using an offset spatula.
Creative Serving Ideas and Pairings
Classic Accompaniment Suggestions
Fresh seasonal berries provide beautiful color contrast while adding natural tartness that balances rich sweetness. Premium vanilla ice cream transforms this dessert into an extra-special celebration treat.
Elegant Presentation Options
Light dusting of confectioner’s sugar creates elegant visual appeal, while hand-shaved chocolate curls add sophisticated texture and intense chocolate flavor. Fresh mint sprigs contribute color and subtle aromatic freshness.
Beverage Pairing Recommendations
Freshly brewed coffee enhances chocolate notes beautifully, while cold whole milk provides classic comfort pairing especially loved by children.
Creative Presentation Ideas
Cut into petit four squares for elegant party presentation. Layer individual servings in glass mason jars with extra frosting for trendy, portable treats. Summer variations include fresh whipped cream and seasonal fruit toppings.
Smart Portion Planning
This recipe generously serves 12 people or creates up to 16 smaller portions. For larger gatherings, consider preparing sheet cake version using 9×13 inch pan with adjusted 35-40 minute baking time.
Common Questions and Expert Answers
Is egg-free preparation possible for this recipe?
Absolutely! Replace each egg with 3 tablespoons of aquafaba (liquid from canned legumes) or use commercial egg replacement products following manufacturer guidelines. Texture will differ slightly while maintaining delicious flavor.
What causes dense, heavy cake texture instead of light results?
Dense outcomes typically result from excessive batter mixing after flour addition, using cold ingredients, or expired leavening agents. Ensure baking powder freshness (replace every six months) and mix ingredients just until barely combined.
How do I recognize perfectly baked cake doneness?
Your cake reaches perfection when wooden picks emerge clean with minimal moist crumbs, surfaces spring back from gentle touch, and edges begin pulling slightly away from pan walls.
Can this batter work for cupcake preparation?
Definitely! This recipe creates approximately 24 standard cupcakes. Fill paper liners about ⅔ full and bake at identical temperature for 18-22 minutes. The chocolate frosting works beautifully for cupcake decoration too.
What creates smooth, spreadable chocolate frosting consistency?
Success requires room-temperature butter and gradual liquid incorporation. Adjust thickness with milk additions (one tablespoon increments) or thin consistency with extra powdered sugar. Extended beating for 2-3 additional minutes achieves silky smoothness.
How far ahead can I prepare this dessert?
Cake layers can be prepared up to 48 hours in advance when properly wrapped at room temperature, or frozen for future use up to three months. Prepare frosting on serving day for optimal results, though it can be made one day early and refrigerated.
My frosting appears grainy – what’s the solution?
Grainy texture indicates incomplete sugar incorporation or overly cold butter. Continue beating mixture for 3-5 additional minutes at medium-high speed, which should resolve texture issues completely.
Final Thoughts on Your Baking Success
This yellow cake with chocolate icing represents more than just a dessert – it’s a gateway to creating memorable moments and sharing joy with people you care about. The combination of straightforward techniques and readily available ingredients means you can create bakery-quality results in your own kitchen.
Remember that baking is both science and art – follow the measurements carefully, but don’t be afraid to add your own creative touches through garnishes, serving presentations, or flavor variations. This yellow cake with chocolate icing recipe provides the perfect foundation for your own baking creativity and family traditions.
So gather your ingredients, warm up that oven, and prepare to fill your home with the incredible aromas of homemade baking. Your family and friends will be amazed by this delicious creation that’s made with care and shared with love.