Chocolate Wafer Cookies: How to Bake Them in 20 Minutes
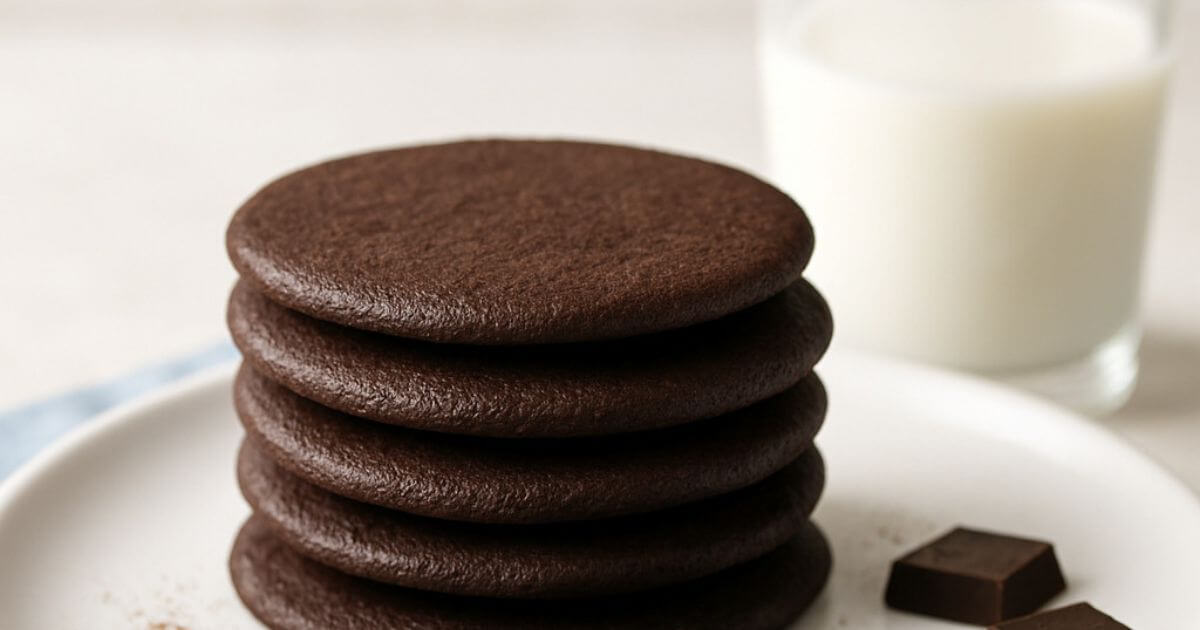
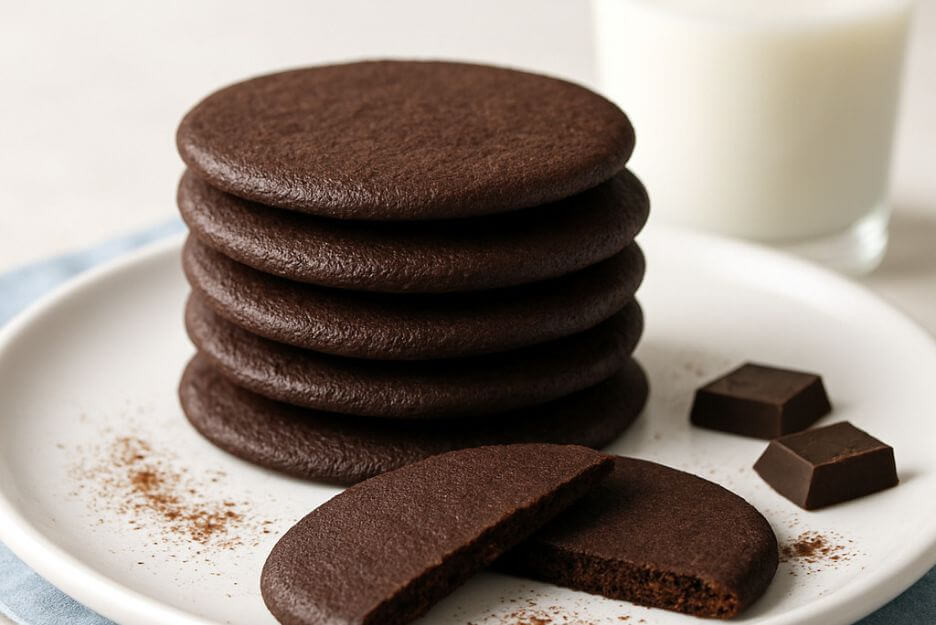
There’s something undeniably irresistible about the rich, crisp perfection of Chocolate Wafer Cookies. These thin, deeply chocolatey delights snap with satisfaction and deliver intense cocoa flavor in every bite. Perfect on their own or as the foundation for countless spectacular desserts, these homemade treats outshine any store-bought version.
Dating back to the early 1900s, chocolate wafers gained popularity as the ideal companion to ice cream and puddings. What began as commercial convenience with Nabisco’s famous version has evolved into a beloved homemade tradition that connects bakers across generations.
The beauty of these Chocolate Wafer Cookies lies in their incredible efficiency. With just 20 minutes of active preparation time, you can create these versatile cookies using basic pantry ingredients. They’re budget-friendly, adaptable to various dietary needs, and guaranteed to elevate your dessert game. Let me show you how to make these perfect chocolate wafers that will impress everyone who tries them.
Table of Contents
Ingredients Section
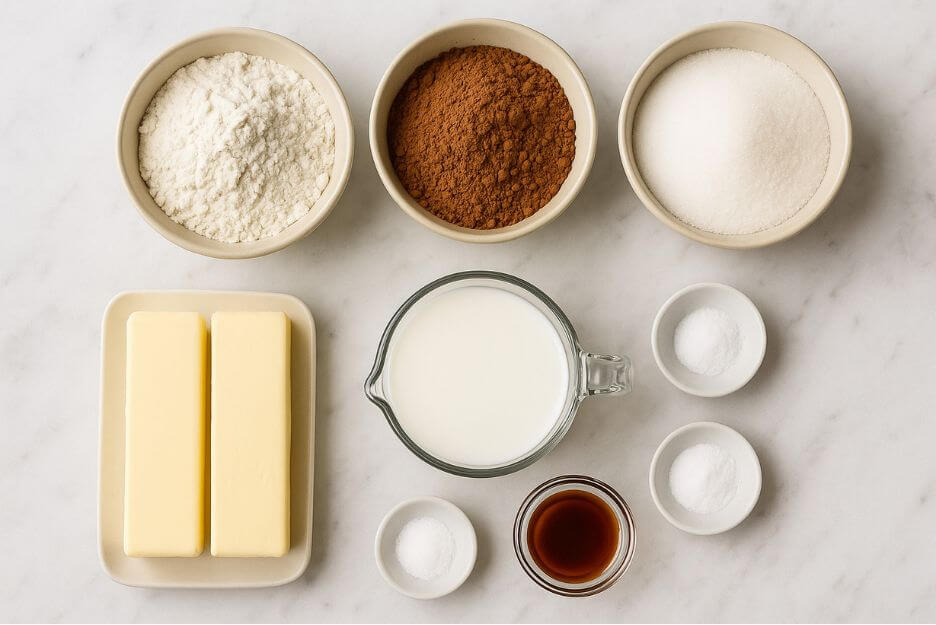
Main Cookie Dough:
- 1½ cups all-purpose flour
- ¾ cup unsweetened cocoa powder (Dutch-processed preferred for richer color)
- 1 cup granulated sugar
- ½ teaspoon salt
- ½ teaspoon baking soda
- 14 tablespoons (1¾ sticks) unsalted butter, slightly softened
- 3 tablespoons whole milk
- 1 teaspoon pure vanilla extract
Dietary Substitutions:
- Gluten-free option: Replace all-purpose flour with a 1:1 gluten-free baking flour blend
- Dairy-free option: Substitute unsalted plant-based butter and plant-based milk
- Vegan option: Use plant-based butter, plant-based milk, and ensure your sugar is vegan-certified
- Lower sugar option: Reduce sugar to ¾ cup and add ¼ teaspoon stevia powder
Ingredient Quality Notes:
- Use high-quality cocoa powder for the best chocolate flavor. Dutch-processed cocoa creates a darker, more intense cookie with better depth.
- Room temperature butter will cream better with sugar, creating the ideal texture.
- Pure vanilla extract (not imitation) makes a noticeable difference in the final flavor profile.
Equipment/Tools Needed
- Stand mixer or hand mixer with large bowl
- Measuring cups and spoons
- Sifter or fine-mesh strainer
- Rolling pin
- Parchment paper
- Baking sheets
- 2-inch round cookie cutter (or drinking glass with similar diameter)
- Cooling rack
- Offset spatula
Equipment Alternatives:
- No mixer? You can use a wooden spoon and extra elbow grease for mixing
- No cookie cutter? Use the rim of a drinking glass
- No parchment paper? A silicone baking mat or lightly greased baking sheet will work
- No rolling pin? Use a clean wine bottle or tall glass
Step-by-Step Instructions
- Prepare your workspace by preheating your oven to 350°F (175°C) and lining two baking sheets with parchment paper. This preparation ensures your cookies will bake evenly and won’t stick.
- Combine dry ingredients by sifting the flour, cocoa powder, salt, and baking soda into a medium bowl. Sifting prevents lumps and ensures even distribution of the leavening agents throughout your chocolate wafer dough.
- Cream the butter and sugar in your stand mixer with the paddle attachment (or in a large bowl using a hand mixer) on medium speed for 2-3 minutes until light and fluffy. The mixture should lighten in color and increase slightly in volume.
- Add wet ingredients by pouring in the milk and vanilla extract while mixing on low speed until just combined. The mixture may look slightly curdled at this point, which is perfectly normal.
- Incorporate dry ingredients by gradually adding the flour-cocoa mixture to your wet ingredients on low speed, mixing just until no dry streaks remain. Avoid overmixing, which can make your chocolate wafers tough.
- Form the dough into a flat disk, wrap in plastic wrap, and refrigerate for at least 30 minutes (or up to 2 days). Chilling the dough makes it easier to roll out and helps the cookies hold their shape while baking.
- Roll out the dough between two sheets of parchment paper to approximately ⅛-inch thickness. If the dough becomes too soft to work with, return it to the refrigerator for 10 minutes.
- Cut out cookies using your 2-inch round cutter, arranging them on the prepared baking sheets about 1 inch apart. These chocolate wafer cookies spread very little during baking.
- Collect and re-roll the scraps to cut out more cookies, repeating until all the dough is used.If the dough gets too soft, place it back in the refrigerator to chill before proceeding.
- Bake the cookies for 10-12 minutes, rotating the pans halfway through baking. The cookies are done when they appear dry on top and the edges are firm. They will crisp up further as they cool.
- Cool completely by letting the chocolate wafers rest on the baking sheet for 5 minutes before transferring to a wire cooling rack. Allow them to cool completely before storing or using in another recipe.
Expert Tips & Variations
- Perfect crispness tip: For extra-crisp chocolate wafer cookies, roll the dough slightly thinner and extend baking time by 1-2 minutes, watching carefully to prevent burning.
- Even thickness trick: Use wooden dowels or specialty rolling pin rings on either side of your dough to ensure perfectly even thickness every time.
- Flavor variations: Add ½ teaspoon of espresso powder to intensify the chocolate flavor without adding coffee taste, or include ¼ teaspoon of cinnamon for a Mexican chocolate twist.
- Avoid common pitfalls by measuring flour correctly – spoon it into your measuring cup and level with a knife rather than scooping directly with the measuring cup, which compacts flour and can result in dry cookies.
- Temperature matters: If your butter is too cold, your dough will be crumbly; if it’s too warm, your cookies will spread too much. The ideal butter temperature is cool but pliable.
- Storage strategy: Store these famous chocolate wafer cookies between sheets of parchment paper to prevent them from sticking together or absorbing moisture.
- Make ahead option: The dough can be frozen for up to 3 months – simply thaw overnight in the refrigerator before rolling and baking your chocolate wafer recipe.
Nutritional Information
Per cookie (based on recipe yield of approximately 36 cookies):
- Calories: 75
- Total Fat: 4g
- Saturated Fat: 2.5g
- Cholesterol: 10mg
- Sodium: 45mg
- Total Carbohydrates: 9g
- Dietary Fiber: 1g
- Sugars: 5g
- Protein: 1g
Health Benefits of Key Ingredients:
- Dark cocoa powder contains flavonoids that act as antioxidants
- Using high-quality cocoa provides minerals like magnesium, iron, and zinc
- When made with plant-based alternatives, these cookies can fit many dietary needs
Storage & Reheating Instructions
Short-term storage: Keep your chocolate wafer cookies in an airtight container at room temperature for up to 1 week. Place parchment paper between layers to maintain crispness and prevent sticking.
Extended shelf life: For longer storage, these cookies will keep in the refrigerator for up to 2 weeks in an airtight container.
Freezing instructions: Chocolate wafer cookies freeze beautifully for up to 3 months. Place in freezer-safe containers with parchment between layers. Alternatively, freeze the raw dough disk wrapped tightly in plastic wrap and foil.
To refresh stale cookies, pop them on a baking sheet and warm them in a 300°F oven for 3–5 minutes. Allow them to cool completely before serving to restore their crisp texture.
Avoiding moisture: Keep these cookies away from moisture-rich environments or containers with other baked goods that might soften their texture.
Serving Suggestions
- Classic Icebox Cake: Layer chocolate wafer cookies with sweetened whipped cream, refrigerate overnight, and slice for an elegant dessert that looks like you spent hours in the kitchen.
- Cookie Crust Base: Crush your chocolate wafers and combine with melted butter to create a spectacular base for cheesecakes or chocolate mousse pies.
- Ice Cream Sandwiches: Fill two cookies with a small scoop of vanilla, mint, or coffee ice cream for a delightful handheld treat.
- Elegant Garnish: Stand cookies vertically in mousse cups, parfaits, or puddings for a sophisticated presentation that adds textural contrast.
- Beverage Pairings:
- Coffee or espresso highlights the chocolate notes
- Cold milk creates the classic cookies-and-milk experience
Presentation Ideas: Dust with powdered sugar for a simple but elegant finish, or drizzle with melted white chocolate for special occasions. Stack in a clear glass cookie jar for an inviting display that showcases their perfect uniformity.
FAQ Section
Q: Why did my chocolate wafer cookies turn out soft instead of crisp? A: Soft chocolate wafers usually result from either underbaking or making the cookies too thick. Ensure your dough is rolled to ⅛-inch thickness and bake until the edges are firm. Remember that cookies continue to crisp as they cool.
Q: Can I make chocolate wafer cookies without a stand mixer? A: Absolutely! While a stand mixer makes the process easier, you can use a hand mixer or even mix by hand with a wooden spoon. The key is to cream the butter and sugar thoroughly before adding other ingredients.
Q: How can I get perfectly round chocolate wafer cookies? A: After cutting out your cookies, chill them on the baking sheet for 10 minutes before baking. This helps them maintain their shape in the oven. You can also freeze the cut dough for 5 minutes for even better results.
Q: Are chocolate wafer cookies the same as Oreo cookies without the filling? A: While similar in appearance, homemade chocolate wafer cookies have a more pronounced chocolate flavor and lighter texture than commercial sandwich cookies. They’re less sweet and have a more authentic cocoa taste.
Q: How do I store leftover cookie dough? A: Wrap unused chocolate wafer dough tightly in plastic wrap, then place in a freezer bag. It will keep in the refrigerator for up to 3 days or in the freezer for 3 months. Thaw overnight in the refrigerator before using.
Q:Is it possible to make these cookies ahead of time for a party? A: These famous chocolate wafer cookies are perfect for making ahead! They actually improve in flavor after 24 hours and maintain their texture for up to a week when properly stored.
Q: Why do my chocolate wafers taste bitter? A: If your cookies taste bitter, you may be using too much cocoa powder or natural cocoa instead of Dutch-processed. Measure carefully and consider reducing the cocoa slightly or adding 1-2 tablespoons more sugar.
Chocolate Wafer Cookies deliver rich cocoa flavor and perfect crispness with minimal effort. In just 20 minutes of prep time, you’ll create versatile treats that outshine any store-bought version. Whether used as building blocks for impressive desserts or enjoyed on their own, these homemade chocolate wafers will become a staple in your baking repertoire. Their simple ingredients and straightforward process prove that sometimes the most uncomplicated recipes yield the most spectacular results.