Cherry Pie Bars: How to Bake the Quickest Treat
Imagine the comforting taste of a warm, bubbling cherry pie the tartness of the fruit, the sweetness of the filling, and the unmistakable flavor of flaky crust. Now imagine getting all that classic flavor in a fraction of the time, with minimal effort and just one pan. Sound like a baking dream? It’s not! It’s the magic of Cherry Pie Bars.
The traditional double-crust pie has a long and storied history, dating back to ancient Egypt and Rome, but the modern, casual “bar” version is a purely American invention, born from a desire for portable, easy-to-share desserts. While the classic pie demands precision rolling, crimping, and delicate handling, Cherry Pie Bars offer a simple, rustic solution. They deliver that deep, satisfying cherry flavor without the fuss.
The key benefit of this simple Cherry Pie Bars recipe is its sheer speed and ease. It’s perfect for beginner bakers, busy parents, or anyone who needs a crowd-plepleasing dessert, fast. Plus, they travel beautifully, making them ideal for potlucks or picnics. With a perfect ratio of crust to filling, these Cherry Pie Bars are about to become your new favorite dessert.
Ready to trade your rolling pin for a simple spatula? Let’s dive into how to make these unbelievably easy and delicious treats.
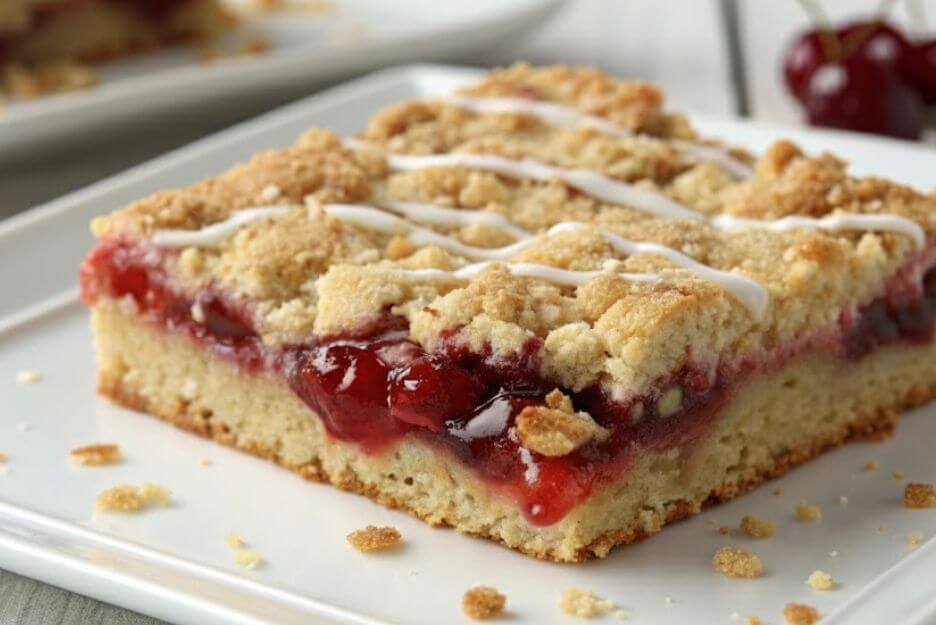
Table of Contents
Ingredients for Easy Cherry Pie Bars
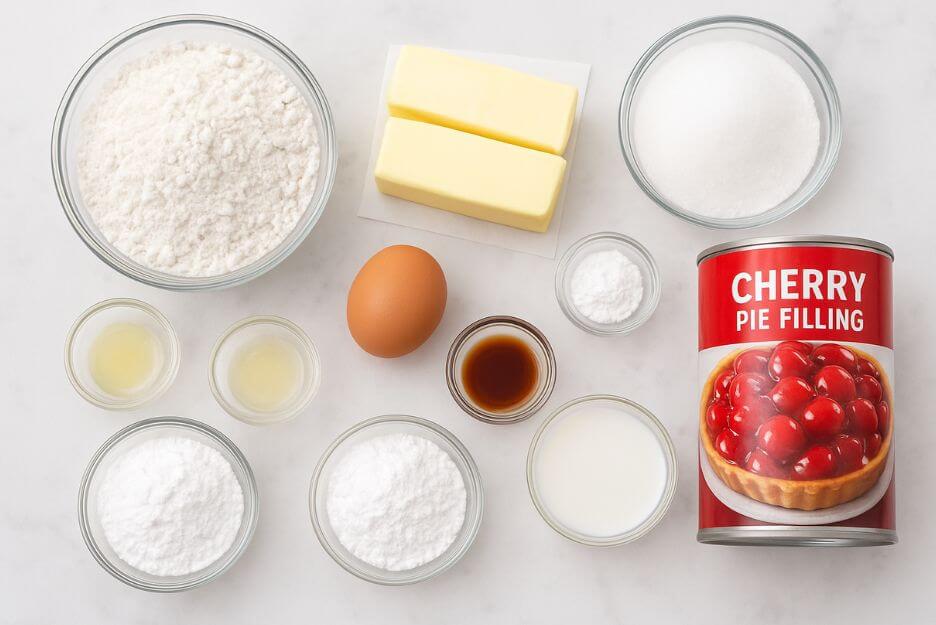
The beauty of this recipe lies in its short, simple ingredient list. We’ve broken it down into three easy stages: the crust, the filling, and the optional glaze.
The Flaky Crust
The crust is a buttery base and a crumbly topping all in one—a truly efficient baking hack!
- 2 cups All-Purpose Flour (or Gluten-Free Blend)
- 1 cup (2 sticks) Unsalted Butter, chilled and cubed
- 3/4 cup Granulated Sugar
- 1 teaspoon Baking Powder
- 1/4 teaspoon Salt
- 1 Large Egg, lightly beaten
- 1 teaspoon Vanilla Extract
Ingredient Quality Note: Use a high-quality, flavorful butter. Since butter is the main flavor in your crust, a good brand makes a big difference in the final taste of your Cherry Pie Bars.
The Simple Cherry Filling
We’re using a quick and easy approach with canned filling to achieve the title of the quickest treat.
- 2 (21-ounce) cans Cherry Pie Filling (store-bought or homemade)
- 1/4 teaspoon Almond Extract (optional, but highly recommended for depth)
- 1 tablespoon Lemon Juice, fresh squeezed
Optional Sweet Glaze
For a picture-perfect finish, this glaze is simple but lovely.
- 1 cup Powdered Sugar
- 2-3 tablespoons Milk (dairy or non-dairy)
- 1/2 teaspoon Vanilla Extract
Ingredient Substitution Options
- Dairy-Free: Substitute the butter with an equal amount of cold vegan butter sticks. Use your favorite non-dairy milk (almond, soy, or oat) for the glaze.
- Gluten-Free: Use a measure-for-measure gluten-free flour blend in place of all-purpose flour for the crust.
- Filling Variation: You can swap the cherry filling for blueberry, apple, or peach to create different bar flavors. This easy Cherry Pie Bars method works with almost any fruit.
Equipment & Tools Needed
You don’t need any fancy gadgets for this simple Cherry Pie Bars recipe. A few basics will get the job done!
Essential Tools
- 9×13 inch Baking Pan: This is the ideal size for perfectly portioned bars.
- Large Mixing Bowl: For mixing the crumbly crust.
- Electric Mixer (Handheld or Stand): While you can use a pastry blender or your hands, a mixer makes the crumb-making process much faster and more consistent.
- Rubber Spatula: For pressing the crust and spreading the filling.
- Wire Rack: Essential for cooling the bars completely.
Alternatives for Uncommon Tools
- No Electric Mixer? No problem! Use a pastry blender to cut the cold butter into the flour mixture, or use your fingertips to quickly rub the butter in until coarse crumbs form.
- No 9×13 pan? A 10-inch square pan will work, but the bars will be slightly thicker and may require an extra 5-10 minutes of baking time.
Step-by-Step Instructions (7 Simple Steps)
Follow these clear, numbered steps to create your delicious Cherry Pie Bars recipe. We focus on efficiency and amazing flavor!
Step 1: Preheat and Prep Your Pan
Preheat your oven to 375°F (190°C). Line your 9×13-inch baking pan with parchment paper, allowing the edges to overhang. This is a crucial tip for easy removal and cleanup!
Step 2: Combine Dry Crust Ingredients
Whisk together the flour, sugar, baking powder, and salt in your large mixing bowl. Make sure these dry ingredients are thoroughly combined for even texture in the crust.
Step 3: Cut in the Butter (The Quick Way)
Add the cold, cubed butter to the dry ingredients. Beat using your electric mixer on medium speed until the mixture resembles coarse, pea-sized crumbs. This usually takes 1-2 minutes. This mixture is the base of both the crust and the topping.
Step 4: Reserve Topping and Add Egg
Measure out 1 1/2 cups of the crumb mixture and set it aside—this will be your topping. To the remaining crumbs in the bowl, add the beaten egg and vanilla extract. Mix on low speed until the dough just comes together into a moist mass. Don’t overmix!
Step 5: Press the Crust and Add Filling
Press the dough evenly into the bottom of the prepared 9×13-inch pan. Make sure to create a nice, solid layer. Stir the almond extract and lemon juice into the canned cherry pie filling. Spread the enhanced cherry mixture evenly over the pressed crust. Using canned filling helps make this the quickest treat!
Step 6: Sprinkle and Bake
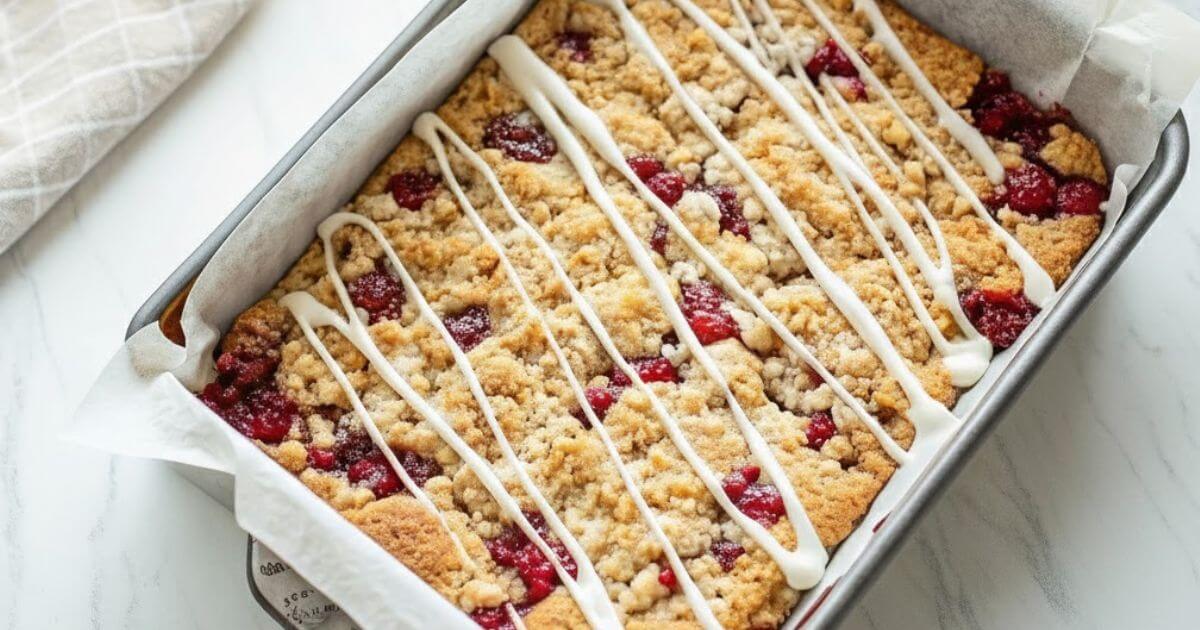
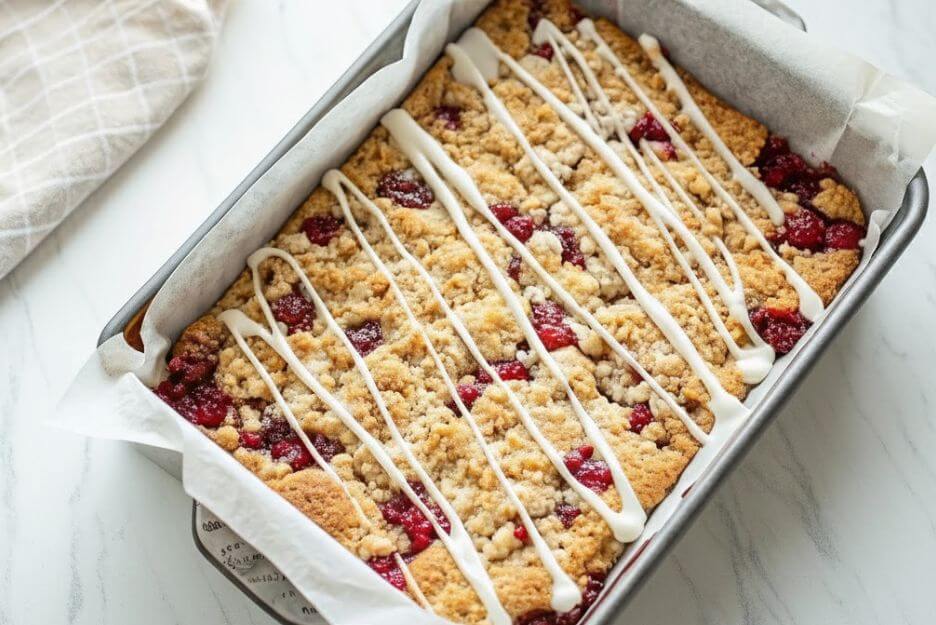
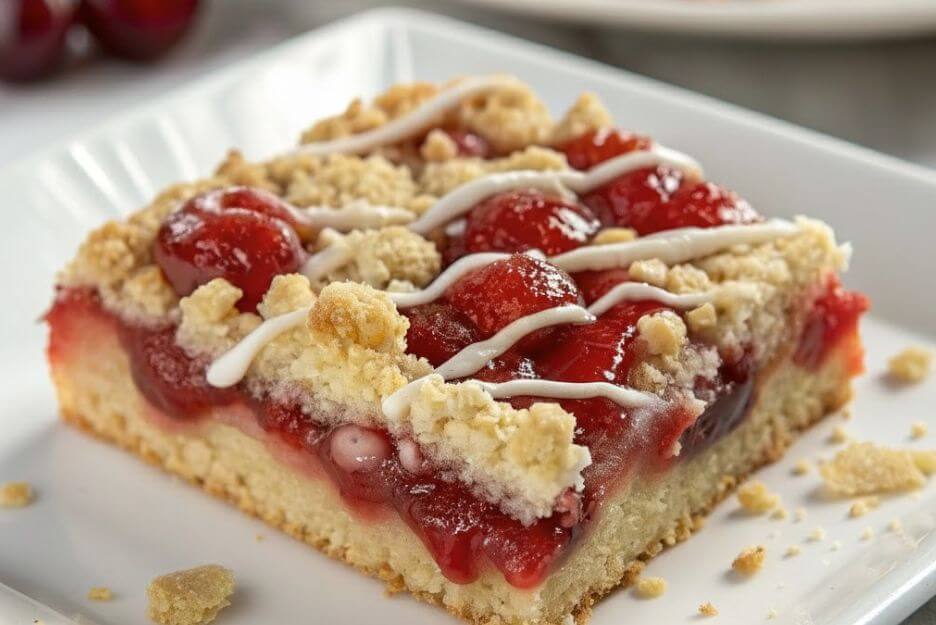
Sprinkle the reserved 1 1/2 cups of crumb mixture evenly over the cherry filling. This forms the signature streusel topping of your Cherry Pie Bars recipe. Bake for 45-55 minutes, or until the topping is a light golden-brown and the filling is visibly bubbling. The perfect visual cue is that golden top!
Step 7: Cool and Glaze
Remove the bars from the oven and place the pan on a wire rack. Let them cool completely—at least 2 hours—before lifting the bars out using the parchment paper overhang. Whisk together the glaze ingredients until smooth. Drizzle the glaze over the cooled bars and allow it to set for about 15 minutes before slicing and serving. This ensures perfect, neat squares!
Expert Tips & Variations for Perfect Bars
Getting these easy Cherry Pie Bars right is simple, but a few expert tips will elevate them from good to truly great.
5 Pro-Tips for Best Results
- Use Cold Butter: This is the golden rule of crumbly crusts. Cold butter creates pockets in the flour that melt and steam during baking, resulting in a wonderfully flaky and tender crumb topping. Warm butter will lead to a dense, chewy crust.
- Cool Completely: This is non-negotiable! Warm bars will fall apart when you slice them because the cherry filling needs time to set. The filling is thickened with modified corn starch (in most canned varieties) which needs to chill to reach its final, stable consistency.
- Don’t Skip the Extracts: The addition of a small amount of almond extract to the filling dramatically enhances the cherry flavor, as it mimics the taste released by cherry pits. It’s a professional baker’s trick for depth of flavor.
- Parchment Paper is Key: Always use the parchment paper sling! It allows you to lift the entire, set batch of bars out of the pan, making slicing neat and cleanup a breeze.
- Bake to a Visual Cue: Look for the edges of the crust to be deep golden and the center topping to be lightly browned. Also, you should see the cherry filling bubbling up along the sides. This ensures the bars are baked through.
Avoiding Common Mistakes
- Crust is too dense: You likely overmixed the dough after adding the egg. Mix until just combined.
- Filling is runny: You sliced the bars too early. Patience is vital! Let the bars cool for at least two hours.
Variations to Try
- Oatmeal Crumble: Replace 1 cup of flour in the crust/topping with 1 cup of rolled oats for a delicious oatmeal cherry pie bars texture.
- Cream Cheese Layer: For an incredibly rich dessert, spread a simple mixture of 8 oz cream cheese, 1/2 cup sugar, and 1 egg over the bottom crust before adding the cherry filling. This creates cheesecake cherry pie bars.
- Spices: Add 1/2 teaspoon of cinnamon or a pinch of nutmeg to the flour mixture for a warmer, richer flavor profile.
Nutritional Information & Health Benefits
While these are a treat, it’s good to know what you’re enjoying!
Disclaimer: The following nutritional information is an estimate based on the ingredients listed and assumes the recipe yields 24 servings. Actual values may vary depending on specific brands and exact portion sizes. This is not a substitute for professional nutrition advice.
| Nutritional Component | Value (Per Bar, estimated) |
| Calories | ~250-280 kcal |
| Total Fat | ~12-15g |
| Saturated Fat | ~7-9g |
| Total Carbohydrates | ~35-40g |
| Dietary Fiber | ~1-2g |
| Sugars | ~20-25g |
| Protein | ~2-3g |
Health Benefits of Key Ingredients
- Cherries: Cherries, especially tart varieties, are rich in antioxidants and anti-inflammatory compounds. They contain melatonin, which may help regulate sleep cycles.
- Butter: As a whole food, butter (when used in moderation) provides fat-soluble vitamins like Vitamin A, D, E, and K.
Storage & Reheating Instructions
Keep your Cherry Pie Bars tasting fresh and delicious with these simple storage tips.
Storage
- Countertop: Store the cooled, sliced bars in an airtight container at room temperature for up to 3 days. Make sure they are completely cooled before storing to prevent moisture and sogginess.
- Refrigerator: For longer storage, transfer the bars to an airtight container and refrigerate for up to 1 week.
Freezing Instructions
These bars freeze wonderfully!
- Freezing: Bake and cool the bars completely. Cut them into individual squares. Arrange the squares on a baking sheet and flash freeze for 1 hour. Once solid, transfer the bars to a freezer-safe, airtight container or freezer bag, separating layers with parchment paper.
- Shelf Life: Frozen Cherry Pie Bars are best enjoyed within 3 months.
- Thawing: Thaw the bars overnight in the refrigerator, or simply place an individual frozen bar on the counter for about 30 minutes.
Best Reheating Methods
- Oven: To restore that “fresh-baked” warmth, place individual bars on a baking sheet and warm them in a 300°F (150°C) oven for 5-8 minutes. This is the best method to re-crisp the crumb topping.
- Microwave: For a quick, warm, and slightly soft treat, microwave individual bars for 15-20 seconds.
Serving Suggestions
These simple Cherry Pie Bars are delicious on their own, but a few small additions can turn them into a show-stopping dessert.
Complements & Garnishes
- The Classic Pairing: A scoop of high-quality vanilla bean ice cream is the ultimate complement. The contrast between the cool creaminess and the warm bar is perfection.
- Whipped Topping: A dollop of freshly whipped cream provides a lightness that balances the rich crust and filling.
- A Sprinkle of Spice: Before serving, lightly dust the top of the bars with a pinch of cinnamon sugar for added warmth and visual appeal.
- Fresh Fruit: Garnish the plate with a few fresh cherries or a dusting of powdered sugar.
Beverage Pairings
- Coffee: A dark roast or a strong espresso provides a robust counterpoint to the sweet, buttery flavor.
- With milk or tea: A simple glass of ice-cold milk or a cup of hot black tea makes for a cozy finish.
FAQ Section: Your Questions About Cherry Pie Bars Answered
We’ve gathered the most common questions people ask when searching for the perfect Cherry Pie Bars recipe.
Q1: Can I use fresh or frozen cherries instead of canned filling?
Yes, absolutely! While canned filling makes this the quickest treat, you can make your own. You’ll need about 6 cups of fresh or frozen pitted cherries. Toss them with 1/2 cup of sugar, 1/4 cup of cornstarch, and 1 tablespoon of lemon juice, then use this mixture in Step 5.
Q2: Why are my Cherry Pie Bars falling apart?
The two main reasons are not cooling long enough and improper slicing. The cherry filling needs the full cooling time (at least 2 hours, sometimes more) to set up like a proper pie filling. Also, always use the parchment paper to lift the entire sheet out of the pan before slicing with a long, sharp knife.
Q3: What is the best way to get a perfectly even crust?
Use the bottom of a measuring cup or a flat-bottomed glass to press the crust down firmly and evenly across the entire pan. This ensures every bar has a consistent thickness.
Q4: Can I make the crust portion of the recipe ahead of time?
Yes, you can. You can prepare the crust mixture (before adding the egg) and store it in an airtight container in the refrigerator for up to 3 days. When you’re ready to bake, let it warm up slightly on the counter, then proceed with adding the egg and pressing the crust into the pan.
Q5: Can I substitute other fruit fillings for this recipe?
Absolutely! This easy Cherry Pie Bars method is versatile. This recipe works perfectly with canned or pre-made fillings like blueberry, apple, raspberry, or peach. Just remember to add a bit of acidity (like lemon juice) and an extract (like vanilla or almond) to give the filling a homemade boost!
Q6: What’s the difference between Cherry Pie Bars and a regular pie?
The main difference is the crust-to-filling ratio and ease of assembly. A regular pie has a thin bottom and top crust. Cherry Pie Bars have a thick, shortbread-like bottom crust, a thick layer of filling, and a crumbly streusel topping. They are much faster to assemble and easier to serve in portions, making them ideal for large groups.
Time to Enjoy the Quickest Treat
You’ve successfully mastered the art of simple dessert-making! These Cherry Pie Bars truly live up to their title as the quickest treat, delivering all the comforting flavors of a classic cherry pie without any of the hassle. From the buttery, crumbly crust to the sweet-tart filling, this recipe is guaranteed to be a hit with family and friends.
Remember to follow the expert tip of cooling completely—it’s the one crucial step to ensure a perfect, neat slice every time. Now, go ahead, grab a bar, and enjoy the delicious results of your super-fast baking adventure!
Would you like me to suggest a few more recipe ideas that are also quick, simple, and perfect for beginners?