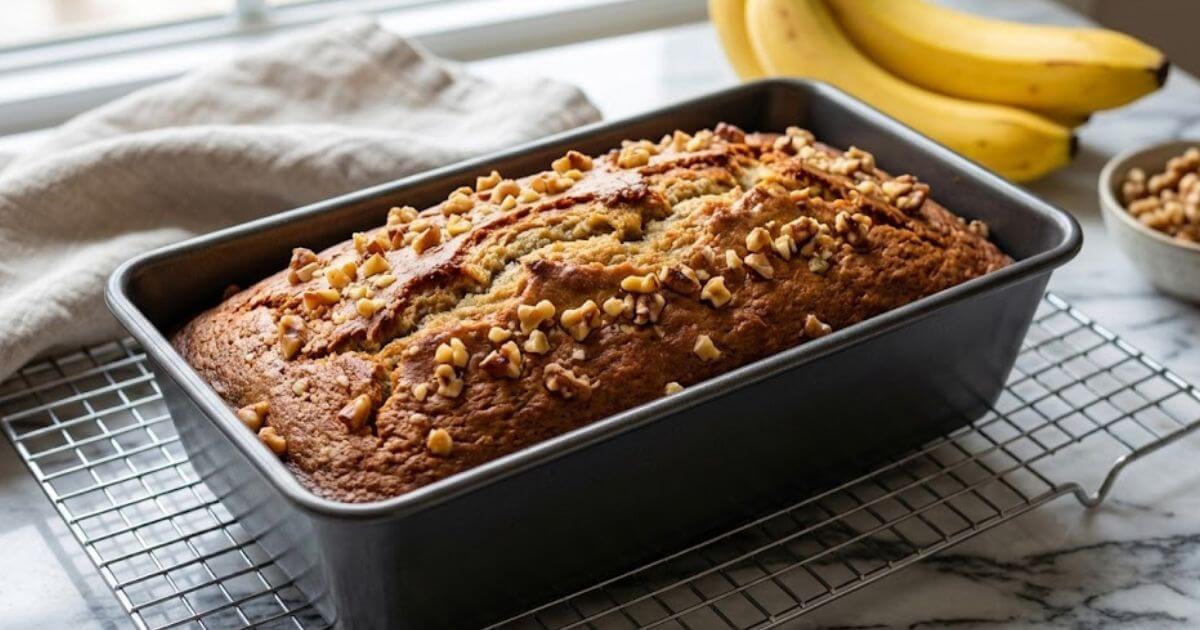
Banana and Nuts Cake: 5 Easy Steps You Must Try
We have all been there. You walk into the kitchen and see them staring back at you from the fruit bowl: three bananas that have arguably seen better days. They are brown, spotty, and look a little sad. But here is the secret that every home baker knows those “sad” bananas are actually gold dust. They are destined for something far greater than a smoothie.
They are destined for the perfect Banana and Nuts Cake.
Banana bread has a long history, gaining massive popularity during the Great Depression because it was a resourceful way to use up overripe fruit so nothing went to waste. Adding nuts, specifically walnuts or pecans, elevates the humble banana bread into a texturally complex cake. It transforms a quick breakfast staple into a dessert worthy of guests.
Why do I love this recipe? It is incredibly budget-friendly, it comes together in one bowl (less washing up!), and it fills your home with the warmest, most comforting aroma imaginable. Plus, the combination of healthy fats from the nuts and potassium from the fruit makes it a guilt-free indulgence.
If you have been hunting for a reliable, Banana and Nuts Cake that doesn’t dry out, you are in the right place. Let’s turn those spotty bananas into something magical.
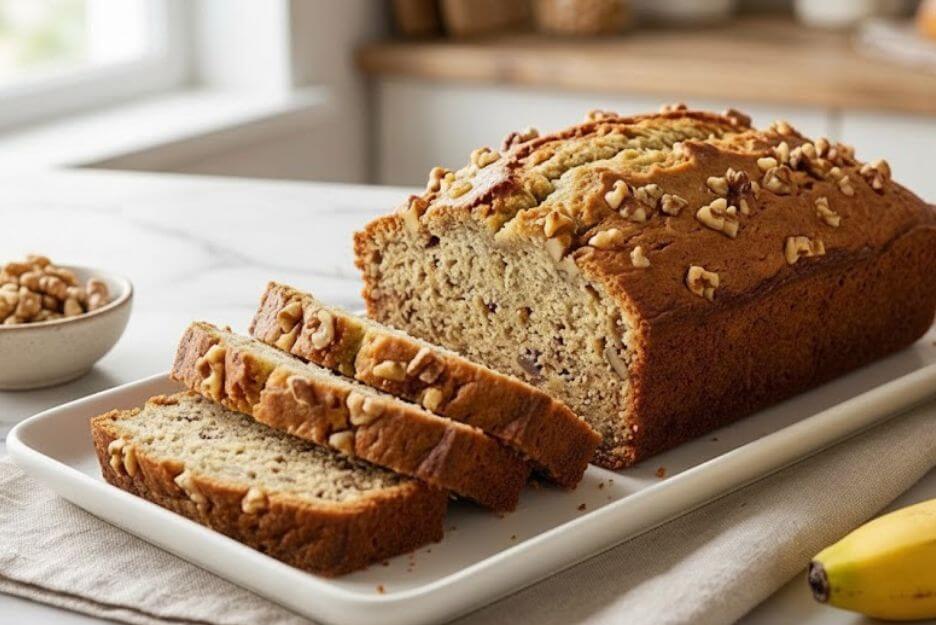
Table of Contents
Ingredients Section
To make the best banana nut cake, you don’t need fancy, hard-to-find items. You have most of these in your pantry.
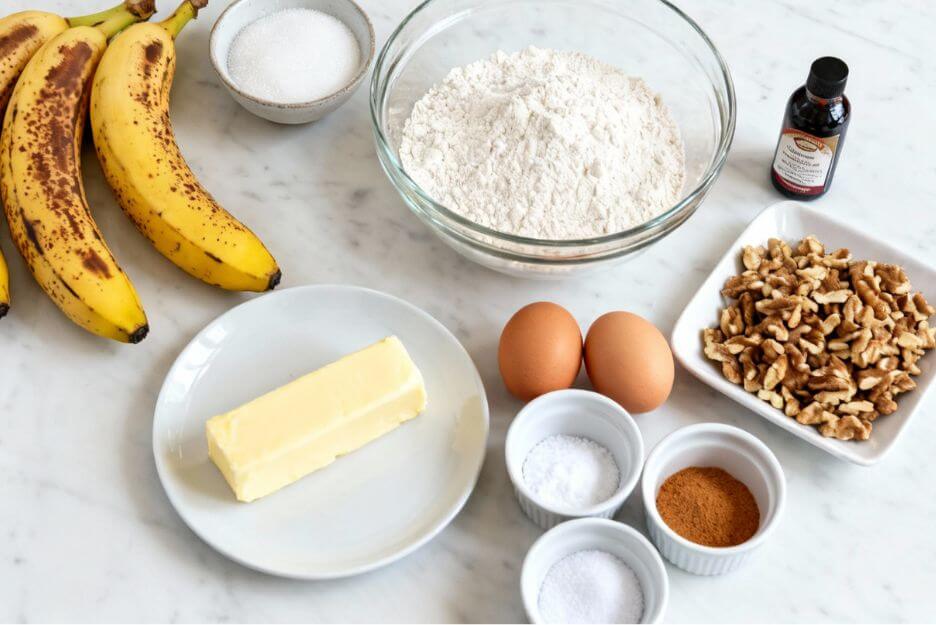
The “Wet” Team:
- 3 Large Overripe Bananas: The browner, the better. Black spots indicate high sugar content, which means natural sweetness and moisture.
- 1/2 cup (115g) Unsalted Butter: Melted and slightly cooled. You can also use a neutral oil (like canola or vegetable) for a lighter crumb.
- 2 Large Eggs: Room temperature is best for emulsification.
- 1 tsp Pure Vanilla Extract: Don’t skip this; it rounds out the banana flavor.
- 3/4 cup (150g) Granulated Sugar: You can split this 50/50 with brown sugar if you want a deeper molasses flavor.
The “Dry” Team:
- 1 1/2 cups (190g) All-Purpose Flour: Spoon and level your flour to avoid a dense cake.
- 1 tsp Baking Soda: The lifting agent.
- 1/2 tsp Salt: Balances the sweetness.
- 1/2 tsp Cinnamon: (Optional) Adds warmth.
The Crunch:
- 3/4 cup (100g) Chopped Nuts: Walnuts or pecans work best. Toast them lightly beforehand for extra flavor!
Substitutions & Dietary Notes:
- Gluten-Free: Swap the all-purpose flour for a 1:1 Gluten-Free Baking Blend.
- Dairy-Free: Use coconut oil instead of butter.
- Nut Allergies: If you can’t do nuts, pumpkin seeds or chocolate chips are great alternatives, though it technically won’t be a Banana and Nuts Cake anymore!
- Lower Sugar: You can reduce the sugar to 1/2 cup if your bananas are almost black, as they will be very sweet on their own.
Equipment/Tools Needed
You don’t need a stand mixer for this banana and nuts cake recipe. In fact, doing it by hand prevents overmixing.
- 9×5 inch Loaf Pan: The standard size. If you use a square tin, adjust cooking time down.
- Large Mixing Bowl: For the batter.
- Medium Bowl: For dry ingredients.
- Fork or Potato Masher: To smash those bananas.
- Whisk and Silicone Spatula: Essential for folding ingredients gently.
- Wire Cooling Rack: To ensure the bottom doesn’t get soggy after baking.
Alternative Tools:
- If you don’t have a loaf pan, this recipe works beautifully as muffins. Just reduce baking time to 18-22 minutes.
Step-by-Step Instructions
While the title promises “5 Easy Steps” (Prep, Mix, Combine, Bake, Cool), we are going to break this down into detail to ensure you get that perfect moist banana and walnut cake every single time.
1. Preheat and Prep
Preheat your oven to 350°F (175°C). Grease your loaf pan with butter or cooking spray. For easy removal, I recommend lining the pan with parchment paper, leaving an overhang on the two long sides to use as handles later.
2. Toast the Nuts (The Chef’s Secret)
Place your walnuts or pecans on a baking sheet and toast them in the preheating oven for about 5-7 minutes. This releases the oils and makes the flavor “pop.” Let them cool before adding to the batter.
3. Mash the Bananas
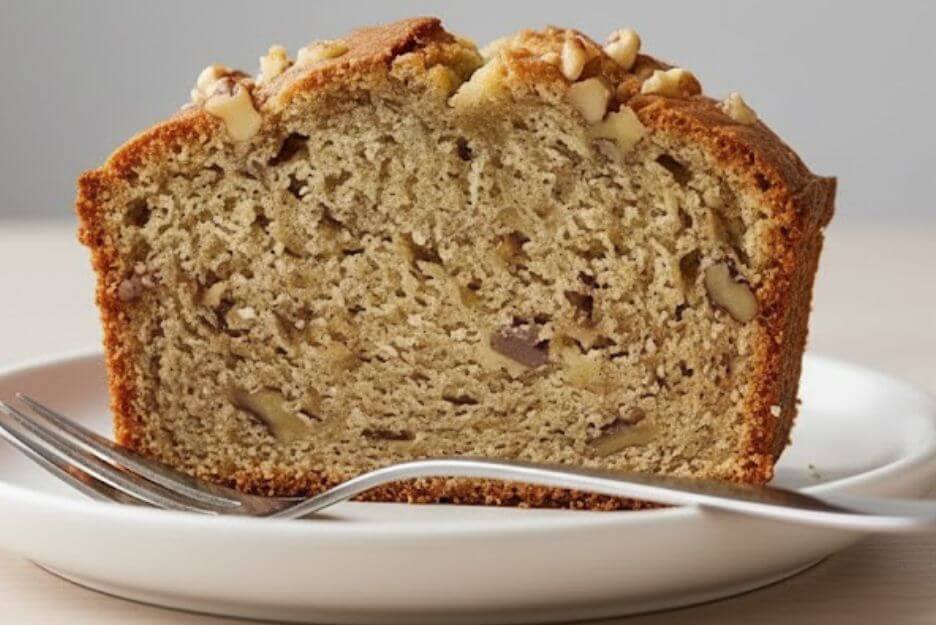
In your large bowl, peel the bananas and mash them. You can leave a few small chunks for texture, or mash them into a smooth purée depending on your preference.
4. Mix the Wet Ingredients
Pour the melted butter into the mashed bananas. Whisk in the sugar, eggs, and vanilla extract. Beat this mixture until it is completely combined and looks slightly creamy.
5. Whisk Dry Ingredients
In a separate medium bowl, whisk together the flour, baking soda, salt, and cinnamon. Whisking here breaks up clumps and ensures the baking soda is distributed evenly.
6. The Gentle Fold
This is the most critical step for a moist banana and nuts cake. Pour the dry ingredients into the wet mixture. Switch to a spatula and gently fold the ingredients together. Stop when you still see a few streaks of flour.
7. Add the Nuts
Toss your toasted nuts into the batter. Fold them in just until the flour streaks disappear. Do not overmix. Overmixing develops gluten, which turns a soft cake into a rubbery brick.
8. Pour and Smooth
Pour the batter into your prepared loaf pan. Use the spatula to smooth the top.
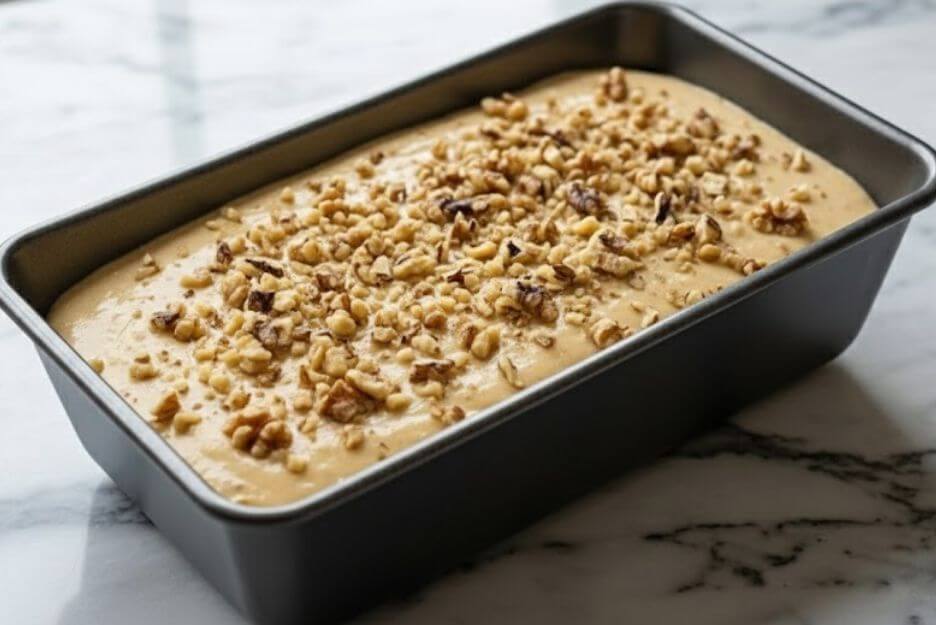
9. The Bake
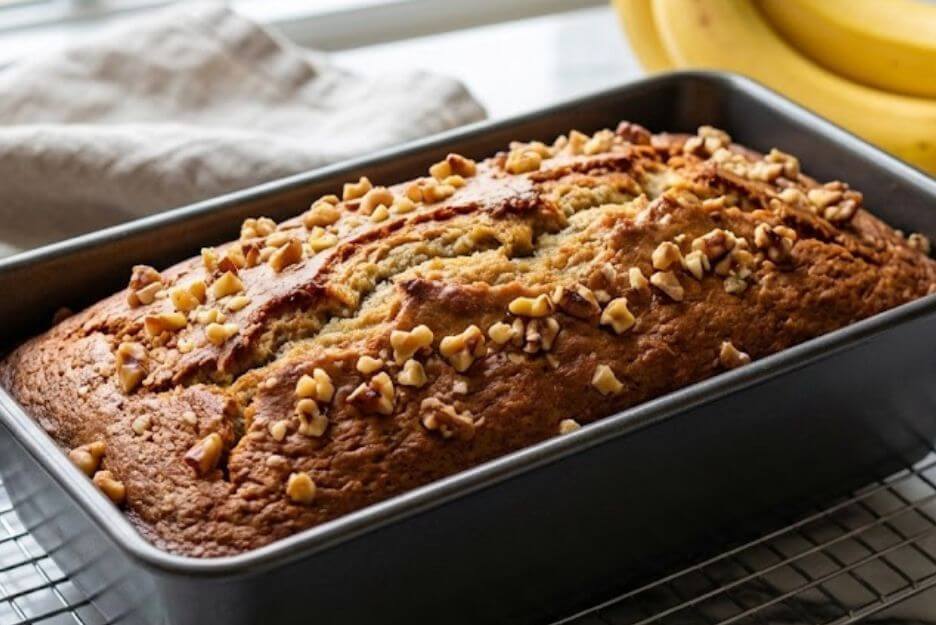
Place the pan on the middle rack of the oven. Bake for 50 to 60 minutes.
10. Visual Cues & Testing
Around the 50-minute mark, test for doneness by inserting a toothpick into the center; it should come out clean or with a few moist crumbs. If the top is browning too quickly while the center is still underbaked, loosely cover the cake with aluminum foil.
11. The Cooling Phase
Remove from the oven. Let the cake cool in the pan for 10 minutes. This allows the structure to set.
12. Final Cool
Lift the cake out using the parchment paper handles and place it on a wire rack to cool completely before slicing.
Expert Tips & Variations
To take your banana and nuts cake recipe from “good” to “bakery level,” keep these tips in mind:
- Ripeness Matters: If your bananas are yellow with green tips, wait. The cake will lack sweetness and moisture. If you are desperate, you can bake unpeeled bananas on a baking sheet at 300°F for 15 minutes to soften and sweeten them artificially.
- The Flour Trap: Don’t scoop the flour directly with the measuring cup. This packs it down, and you’ll end up with too much flour, leading to a dry cake. Spoon the flour into the cup and level it off.
- Room Temperature Ingredients: Cold eggs hitting warm melted butter can cause the butter to seize (clump up). Room temp ingredients mix smoother.
- Prevent Sinking Nuts: If you find your walnuts sink to the bottom of the cake, toss them in one teaspoon of flour before adding them to the batter. This adds “grip.”
Variations to Try:
- Tropical Twist: Add 1/2 cup of shredded coconut and use macadamia nuts.
- Chocolate Lover: Add 1/2 cup of dark chocolate chunks.
- Spiced: Add 1/4 tsp of nutmeg and 1/4 tsp of cloves for a holiday version of this banana walnut cake.
Nutritional Information
Disclaimer: Nutritional values are estimates based on standard ingredients and a yield of 10 slices.
- Calories: 240 per slice
- Total Fat: 11g
- Carbohydrates: 32g
- Protein: 4g
- Sugars: 16g
- Fiber: 2g
Health Benefits:
While this is a treat, it isn’t empty calories! Bananas provide a great hit of potassium and Vitamin B6. Walnuts are a powerhouse of Omega-3 fatty acids, which are excellent for brain health. By making this at home, you avoid the preservatives found in store-bought cakes.
Storage & Reheating Instructions
One of the best things about a moist banana and walnut cake is that it actually tastes better the next day. The flavors have time to meld, and the moisture redistributes.
Storage:
- Counter: Store in an airtight container at room temperature for up to 3 days.
- Fridge: If you live in a hot, humid climate, store it in the fridge for up to 1 week. Note that the fridge can dry it out slightly, so wrap it tight.
Freezing:
- This cake freezes beautifully. Slice the cooled cake, wrap individual slices in plastic wrap, and place them in a freezer bag. They will keep for up to 3 months.
Reheating:
- Microwave: A 15-20 second blast will make a slice taste freshly baked.
- Toaster Oven: Toasting a slice adds a lovely crisp edge to the moist banana and nuts cake interior. Slather with butter while hot!
Serving Suggestions
Want to turn this into a full breakfast spread or a fancy afternoon tea? Here is what pairs well:
Accompaniments:
- Honey Butter: Whip softened butter with a drizzle of honey and a pinch of salt.
- Greek Yogurt: A dollop of vanilla Greek yogurt adds protein and cuts the sweetness.
- Cream Cheese Frosting: If you want to turn this into a dessert cake, a layer of cream cheese frosting is unbeatable.
Beverage Pairings:
- Hot Coffee: The bitterness of dark roast coffee balances the sweet banana flavor perfectly.
- Chai Latte: The spices in chai complement the cinnamon in the cake.
- Cold Milk: A classic choice for kids (and adults!).
FAQ Section
Q: Why is my banana cake dense and rubbery?
A: This usually happens because the batter was overmixed. Once you add the flour, stop mixing as soon as the white streaks disappear. Overmixing activates the gluten in the flour, killing the tender crumb.
Q: Can I use frozen bananas?
A: Absolutely! Frozen bananas are perfect for a banana and nuts cake recipe. Thaw them in a bowl first. They will release a lot of liquid—do not drain this! Pour the liquid into the batter; it’s full of flavor and moisture.
Q: My cake is burning on top but raw in the middle. What do I do?
A: This is common with dense cakes like banana walnut cake. Simply tent a piece of aluminum foil over the top of the pan for the last 15-20 minutes of baking. This shields the top from direct heat while the center finishes cooking.
Q: Can I reduce the sugar?
A: Yes. If your bananas are extremely ripe (mostly black), you can reduce the sugar by about 25% without ruining the texture.
There is something deeply satisfying about pulling a golden-brown loaf out of the oven. It signals comfort, warmth, and home. This Banana and Nuts Cake is more than just a way to save dying fruit; it’s a reliable staple that works for breakfast, a snack, or dessert.
Whether you are an experienced baker or this is your very first attempt, this recipe is forgiving and rewarding. The combination of the sweet, soft crumb with the crunchy, toasted nuts is a texture match made in heaven.
If you like this recipe you might also like:
- Delicious Cake Mix Banana Bread
- Banana Cupcakes
- No-Bake Banana Split Cake Recipe
- Banana Cheesecake Pie